40 Clever Camera Hacks That Will Help Make Snapping Memorable Moments Even Better
We all want those nice, aesthetically pleasing Instagrammable photos. However, not all of us are blessed with high-end fancy tools, studio lights, and whatnot. Those things can cost thousands of dollars. And if we do get a professional photographer to do it, we’d still be spending quite a hefty amount too. That doesn’t mean you can’t get creative, artsy, or professional-looking shots on your own, though. With time, patience, resourcefulness, and creativity, you can achieve similar results to spending big bucks on fancy tools or gear. There are so many DIY hacks, from using tin foil to create a bokeh background and using a plastic bag for softening up the light in the room to finding a workaround to transform a 50mm lens into a macro one to take your photography game to the next level. Remember, there is no wrong or right way to approach photography. If it works, then it works. Here are some simple but genius camera hacks to level up your photography game.
Spice Up Your Portraits With Some Lace
We think everyone should have at least one lovely portrait in their life. But it doesn’t mean having to go to a studio and sit in a stiff pose. There are so many creative ways to do it on your own.
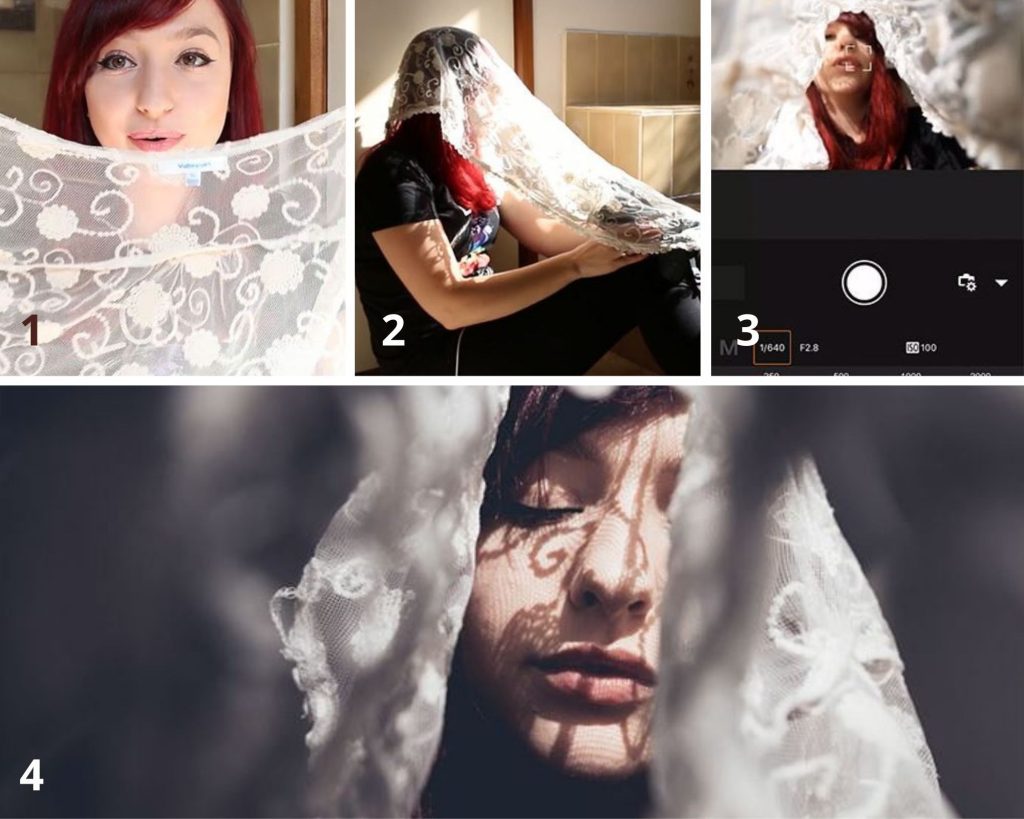
One way you can spice up your portrait is to play around with some lace. Not only does it create pretty and exciting shadows, but you can also use it for some creative framing. Don’t be afraid to go unconventional with the poses. Just find what’s best.
Color Up Your Lens
Those colored filters for your lens can create beautiful effects for any photo. There’s so much you can do with them. However, they can be pretty pricey, and they may not even be worth the cost if you have a hack like this one below.
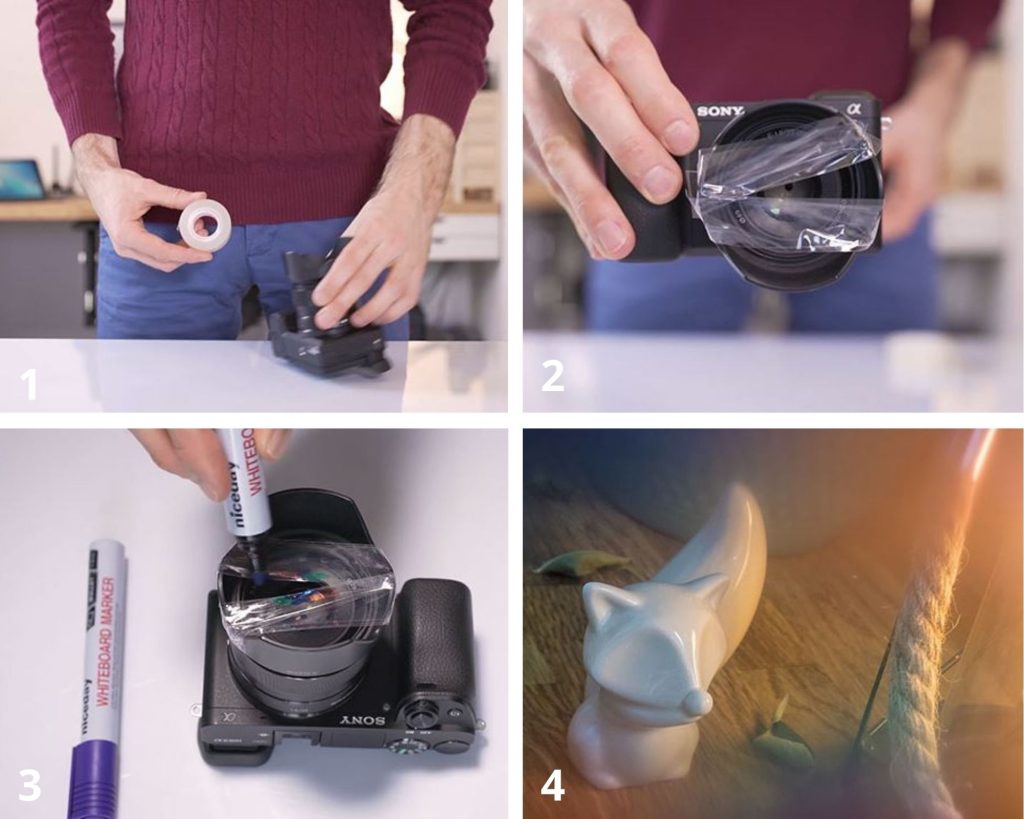
All you have to do is get some clear tape, place a few strips across your lens cap, and take a few colored markers and start coloring. With this hack, you can create more exciting patterns and shadows for your pictures.
Use Windows For That Softening Effect
Usually, you don’t need any fancy gear to create some beautiful effects for your pictures. 99% of the time, all you need can be found around you. You simply have to be a little resourceful. Almost anything can be part of the shoot.
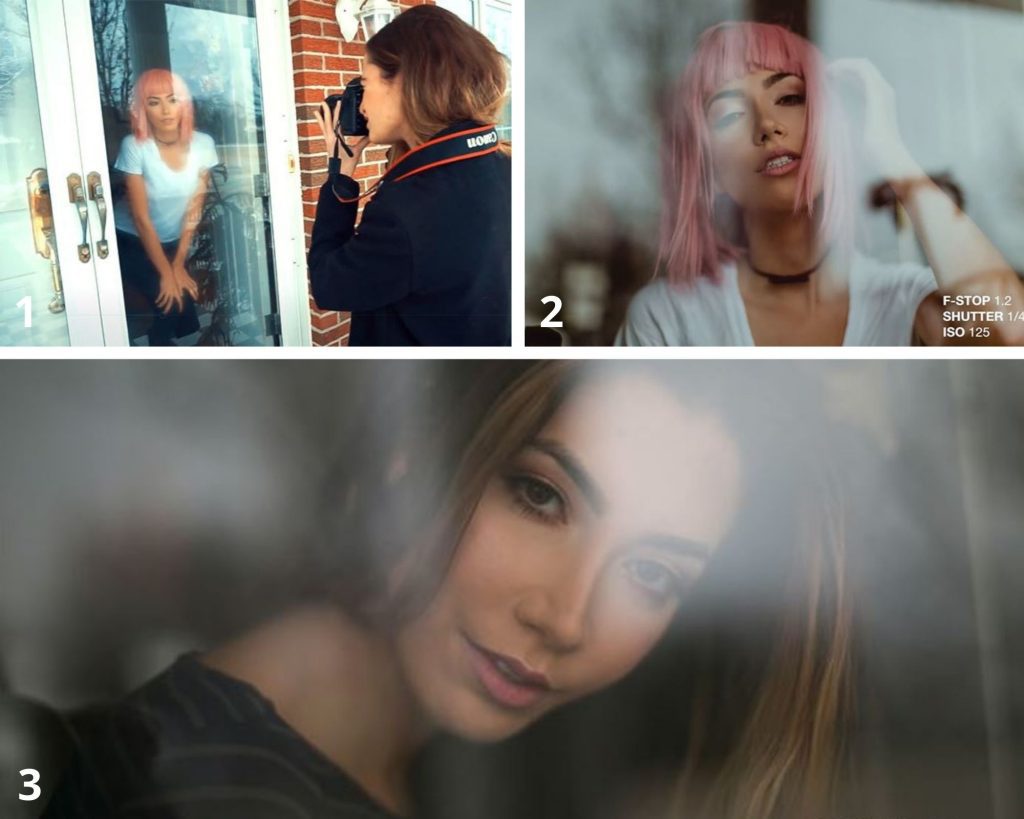
To achieve that softening effect before you even get to post-editing, search for some windows or glass doors and shoot your subject through that. This will create that softening effect and give you some reflections to make the photo more interesting.
Fix Your Lighting With White Cardboard
Lighting is crucial to any photo, and even amateurs will tell you. It can make or break the vision you want to capture, especially when you’re outdoors where you can’t exactly soften up the sun or set up more lights.
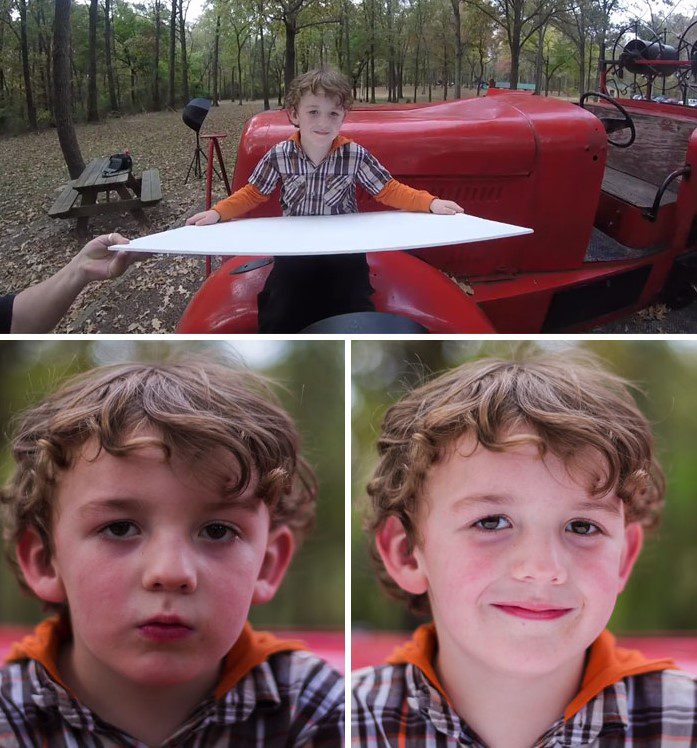
In this situation, it’s always handy to have white cardboard on hand. It’s great for reflecting any natural light and will light up your subject nicely. Depending on what kind of mood you’re going for, you can move the cardboard around to reflect the light in the direction you want it to go.
Use Tinfoil For A Bokeh Background
We don’t know what it is, but there’s just something about bokeh backgrounds that set up a magical or whimsical mood for a photo. Unfortunately, not every budding photographer has the perfect curtains or pretty lights in their house for this effect.
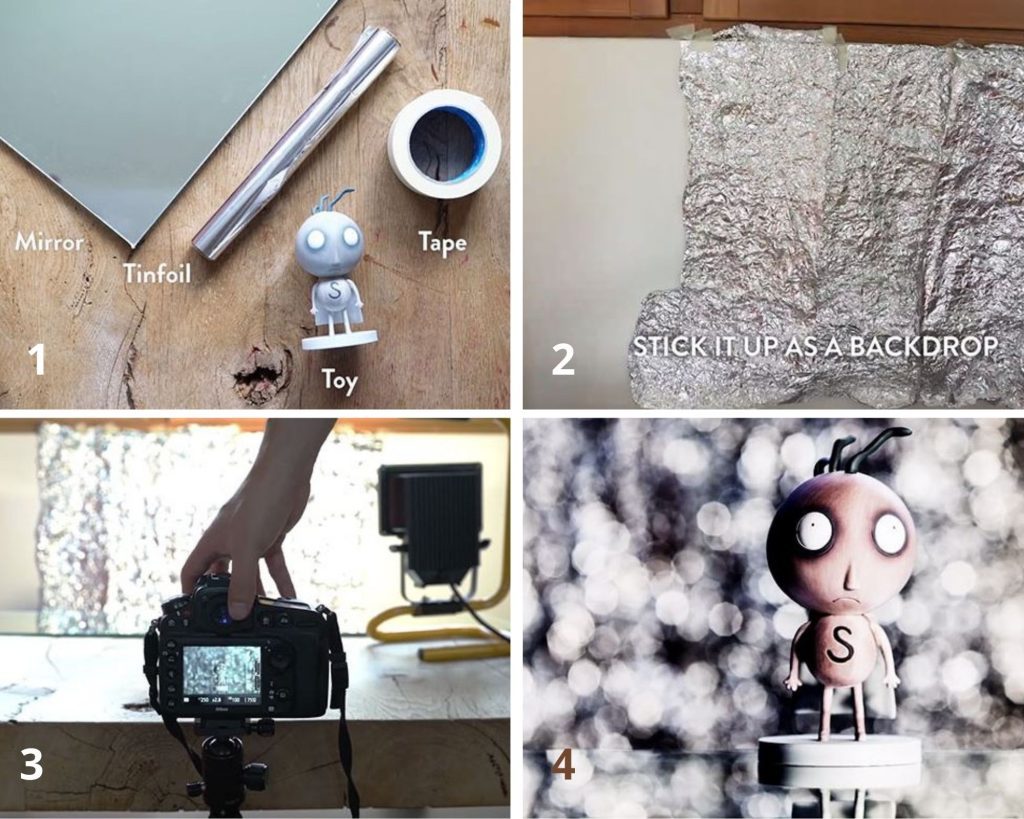
If you’re looking for an easy way to do a bokeh background, though, look around your kitchen. Grab some tin foil, crumple away, then set it up as your background, and shine some light on it. Trust us; it will give you the marvelous bokeh effect you’re seeking.
Manipulate Your Photos With Some Forced Perspective Tricks
It’s easy to say manipulate a lot of things in post-edit. You can make yourself look gigantic next to a building, or you can make yourself look so tiny your cat could eat you. Instead of having to learn complicated Photoshop skills to do this, you can try this trick.
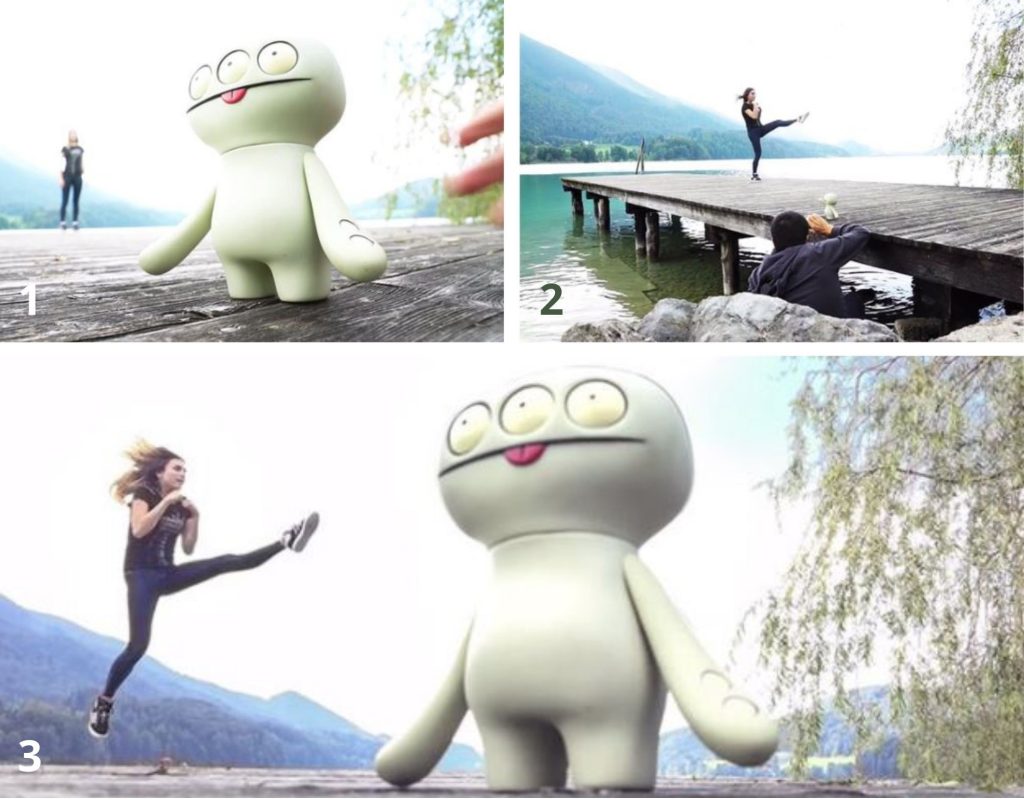
Use angles and forced perspectives to manipulate your subjects and get the effect you want. Experiment, play around, and trust us; you’ll get an epic and fun picture. You can also boost it in post if you want that cartoonish effect.
Cut Shapes In Cardboard And Play Around With Shadows
Shadows are one of the best things to play with in photography. You can do so much and, oh, the drama it creates. It’s just so fun! Not everyone has those windows that make cool shadow effects, though. But you can improvise!
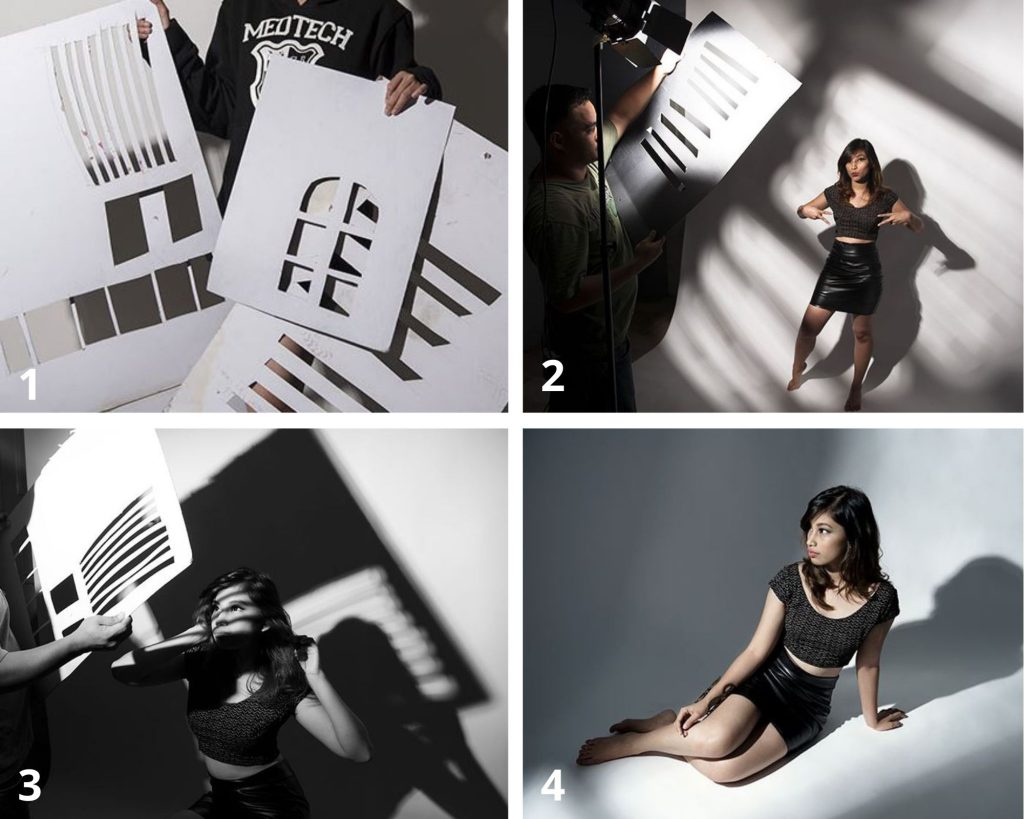
No worries, because you can also fake that with just a few pieces of cardboard and some scissors. All you have to do is cut out window shapes – or any shape you want – and place them near your light source to create your shadows.
Get That Perfect Flat Lay With Some Tape
Flatlays are honestly a bit overused, but what can we say? It’s hard to get enough of them. They’re so simple to make. You just have to pose your items and trinkets the right way and snap. You don’t need to find angles or filters and whatnot.
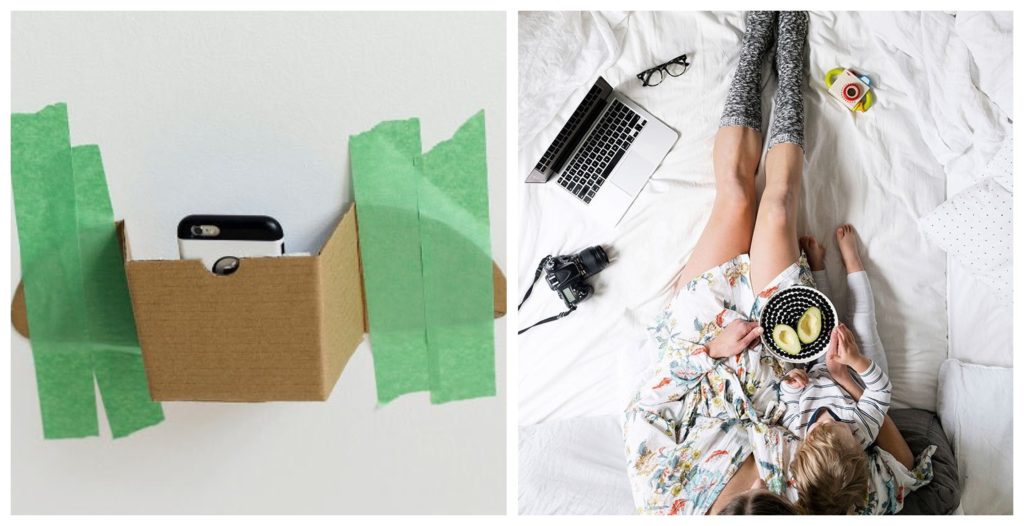
Taking the perfect straight flat lay shot isn’t so simple if you’re doing it alone. One way you can remedy this is to take some tape and a bit of cardboard. Make a little case for your phone and tape it to the ceiling or a sturdy surface you can put above you for the flat lay, and voila.
Use Some Cloth And Cardboard For Professional Seamless Shots
Do you ever wonder how the pros manage to get stunning photos of your favorite products or food? Well, they have all these fancy studio setups to give them seamless backgrounds. The best part is you can imitate these at home.
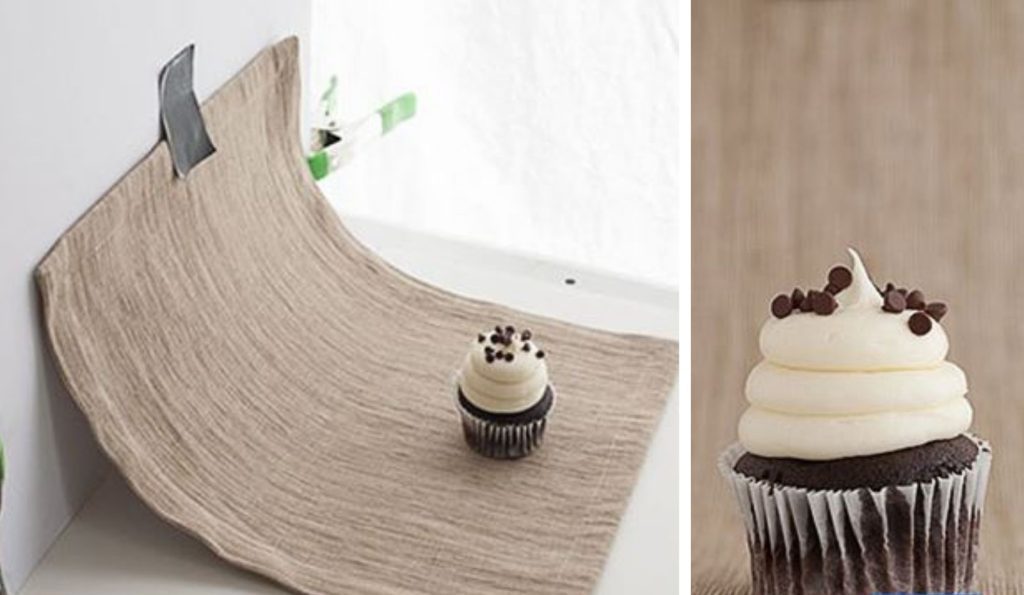
If you’re into product photography or if you’re a business owner who’s looking to upgrade their photos, this tip will work well for you. Simply take some cardboard and tape a piece of cloth to it, making sure there aren’t any harsh lines that can be seen. This will create that seamless background.
Use Your Sunglasses As A Quick Filter
Lugging around all that extra luggage for your gear in your travels can be quite a hassle. While we understand that you want to capture the perfect moment in those beautiful places, there is no need to make it harder for yourself.
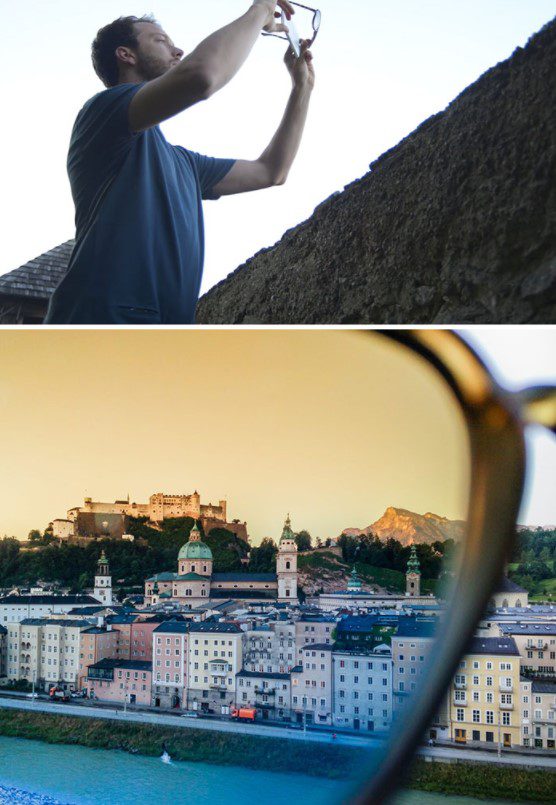
If you have not realized yet, your shades aren’t just good for your eyes. They are also great for giving your photos a boost. Now, you have your very own handy little filter you already take anywhere with you.
Get That Wind Effect With A Hair Dryer
All those models always look so gorgeous and fierce with the wind blowing in their hair and all in photoshoots. The great news is, you can get that modelesque effect for yourself even when you’re at home just taking your selfies.
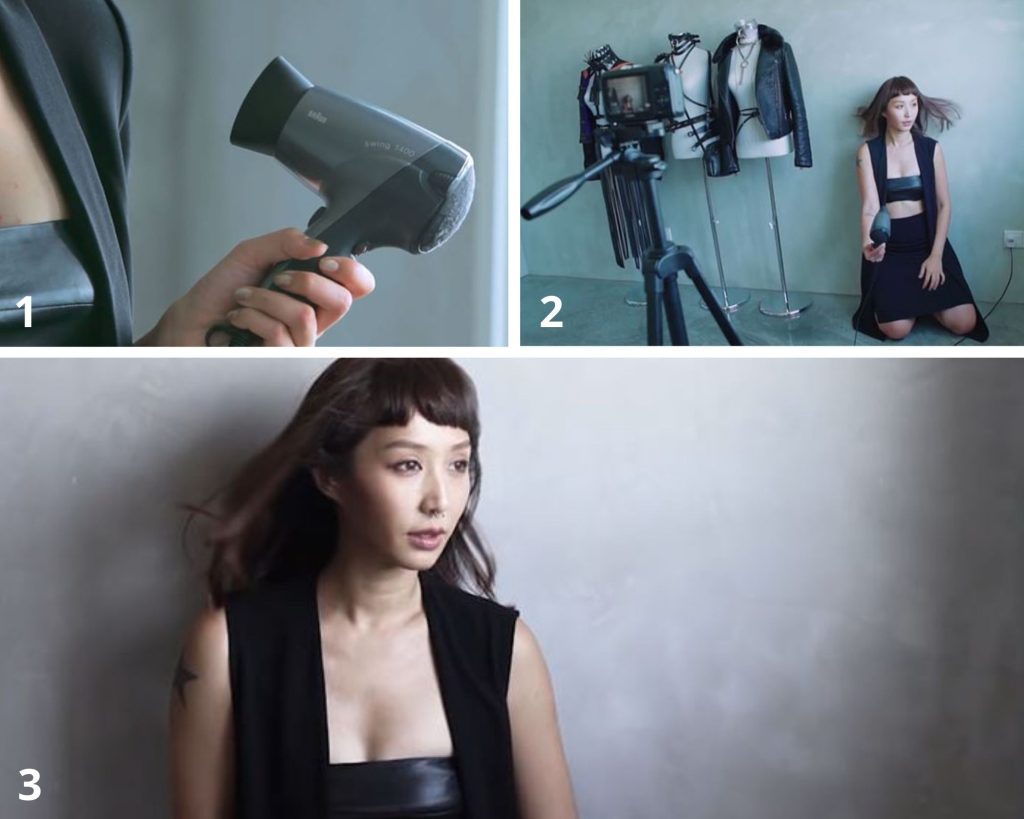
While those models probably have big fancy fans blowing in their faces, a simple hairdryer can suffice for those of us who aren’t really shooting for magazine covers or billboards. It achieves pretty much the same effect at no cost.
Create Your Own Macro Lens
A close-up of the eyes, tiny beautiful insects, raindrops – oh, there is just a whole other world of beauty in close-up shots. Macro lenses that are used to capture these images, though, definitely don’t come cheap, we’re sad to say.
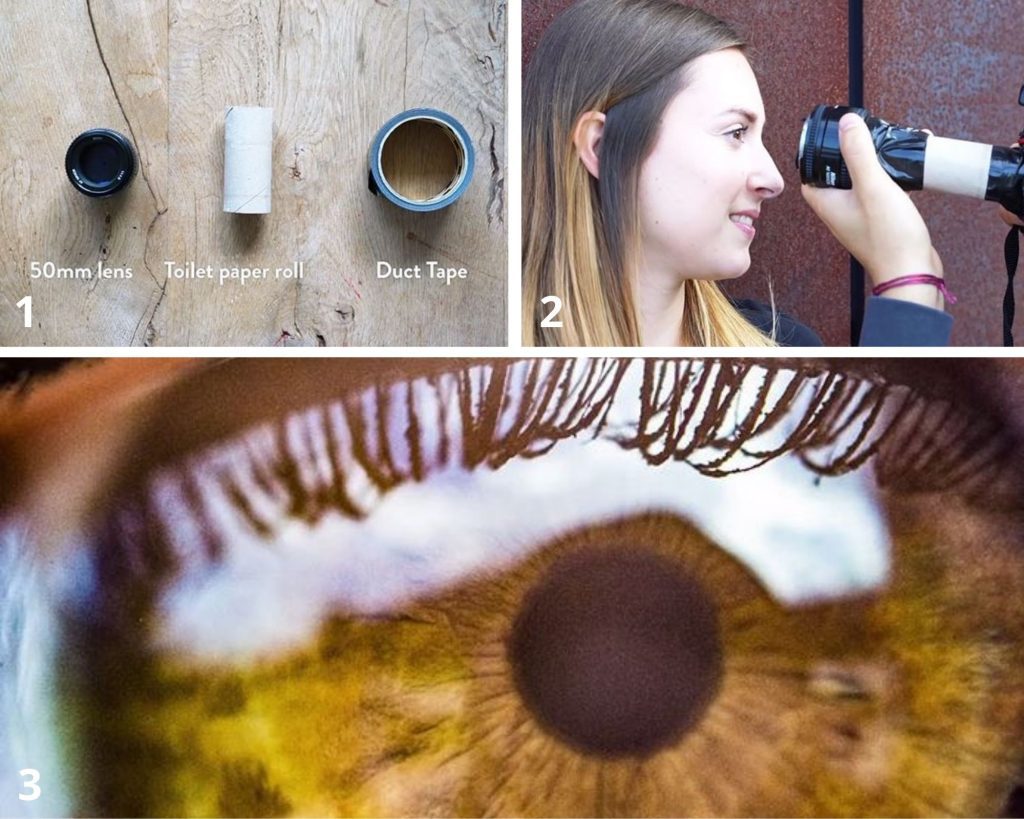
You can still improvise at home, though, with a 50mm lens. Take a toilet paper roll, tape it, and use it as a connecting bridge between your 50mm lens and the mirror box of your camera, as shown in the image. Make sure to seal the toilet paper edges properly to get the proper effect.
Use A Fishtank For Some Slight Underwater Fun
Underwater cameras are still super expensive right now, and you can’t just wrap your cameras in plastic to prevent them from getting wet. So what to do when you want some underwater or overwater shots? Grab a fish tank, friends!
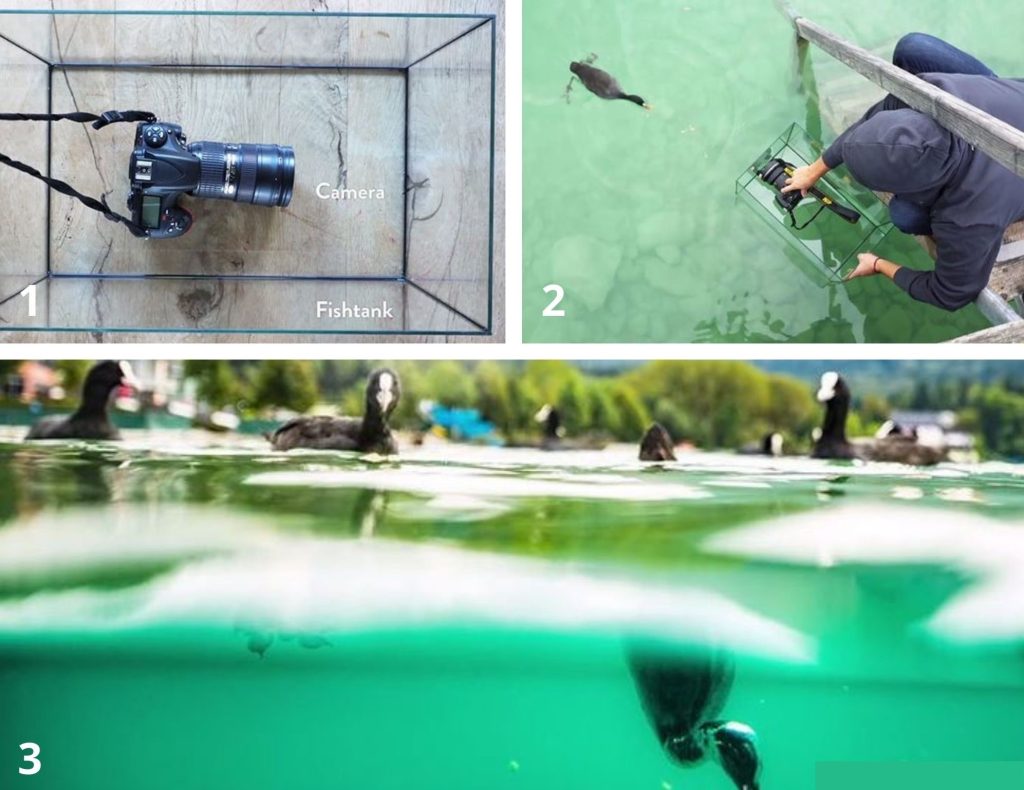
You simply have to place your camera in the tank and start capturing photos or videos from there. Of course, you won’t be able to go too deep – only just a little below the water’s surface – but we’re sure you can make it work.
Instant Fake Macro Bokeh
You just have to play around to find alternatives to studio setups or fancy gears in photography. Most of the time, you can fake a lot of those elements, much like this one right here. It doesn’t even cost anything!

This is perfect for those who might have businesses and want to showcase their products and those who are into macro photography like this guy. You can even fake other backgrounds so you won’t have to spend a cent on getting those beautiful shots.
Look Through Items For A Unique Camera Filter
One of the best things about photography is you could pick anything up and use it as a prop for a photo. And when it comes to filters or framing, it’s pretty much the same thing. Grab anything you can look through and we’re pretty sure it can be a tool.
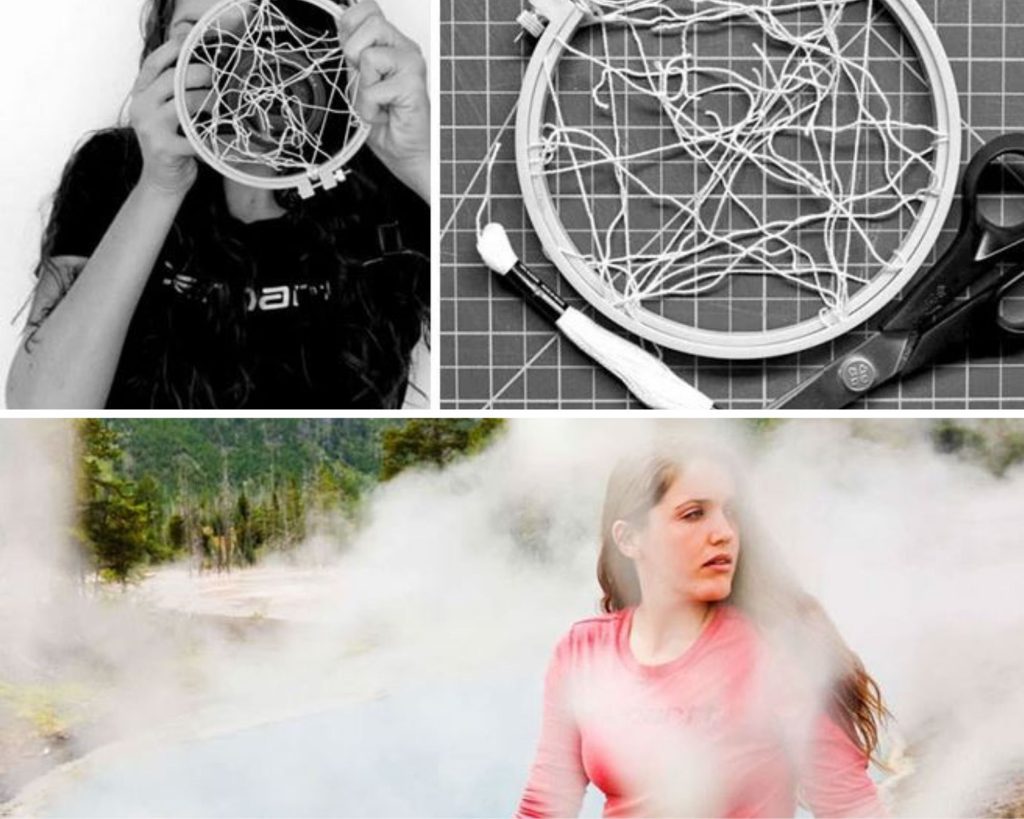
Take this hoop looped with thread. She might have just picked it up from her grandma’s embroidery set, and yet it still helped create stunning results. You could also do this with other items like your hands, grass, ornaments. Endless possibilities!
Use Mirrors To Shine Some Extra Light On Your Subject
Honestly, there is just so much to love when it comes to using mirrors in photography. First off, you can use it as a prop and part of the overall image. You could also use it to boost the elements of your photo, like shining some more light on your subject.
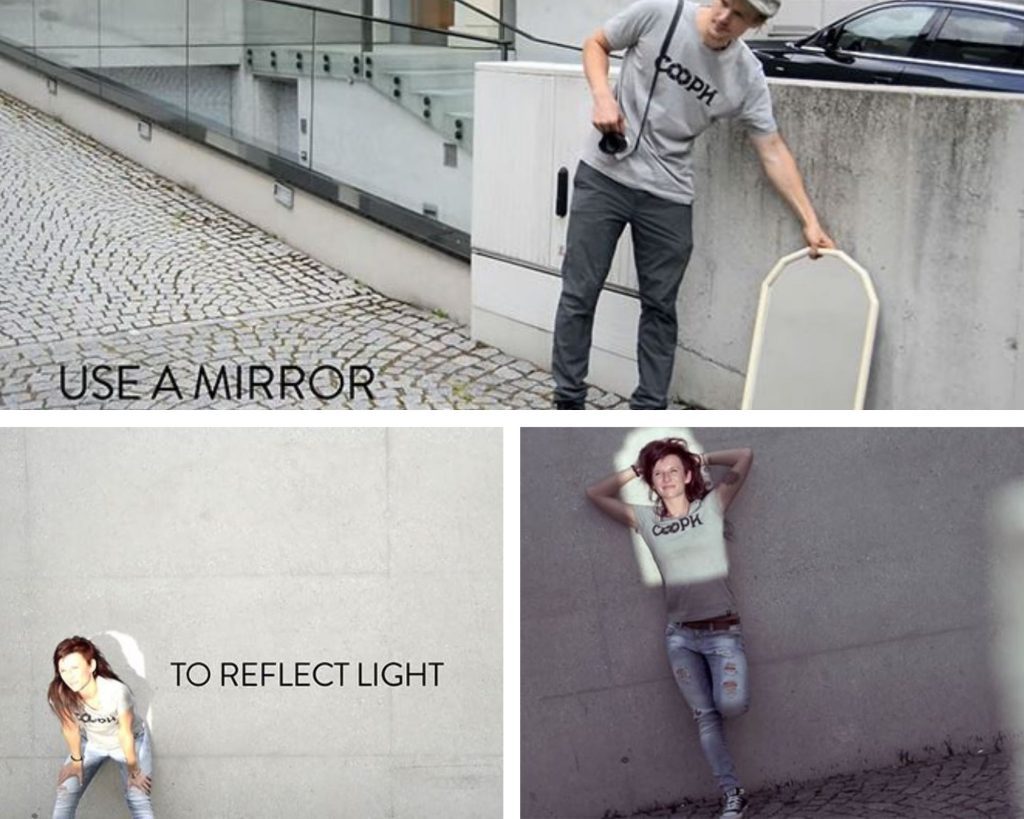
This trick is handy when you don’t have the correct elements to create natural spotlights on your subject. You can improvise and even use flashlights to make that spotlight or add a little spice to make a good image into a great one.
Use A Plastic Bag To Improvise A Softbox
Softboxes are important in studios because they properly distribute and control the shape and direction of light on the subject. However, you do not need to purchase those big things, especially if you are not really constructing a whole studio.
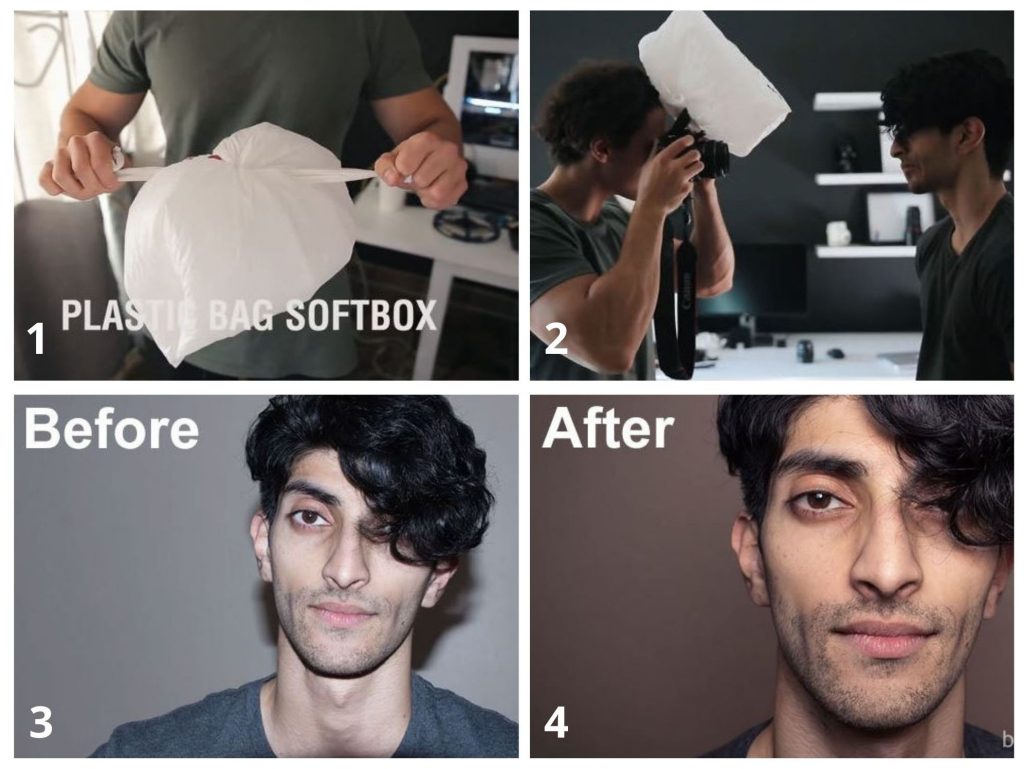
A white plastic bag would do the trick well enough. You just have to wrap it around your camera flash, and voila, you have your very own portable softbox. Now, you don’t have to worry about overly harsh lights or shadows anymore.
Smear Some Vaseline On Some Clear Wrap For A Soft Focus Lens Effect
Soft focus photos are when you purposely artistically blur part of the image and they’re best used on glamour shots or portraits. Generally, you can use them when you want to get rid of too much fine detail and give a soft, dreamy feel to your subject.
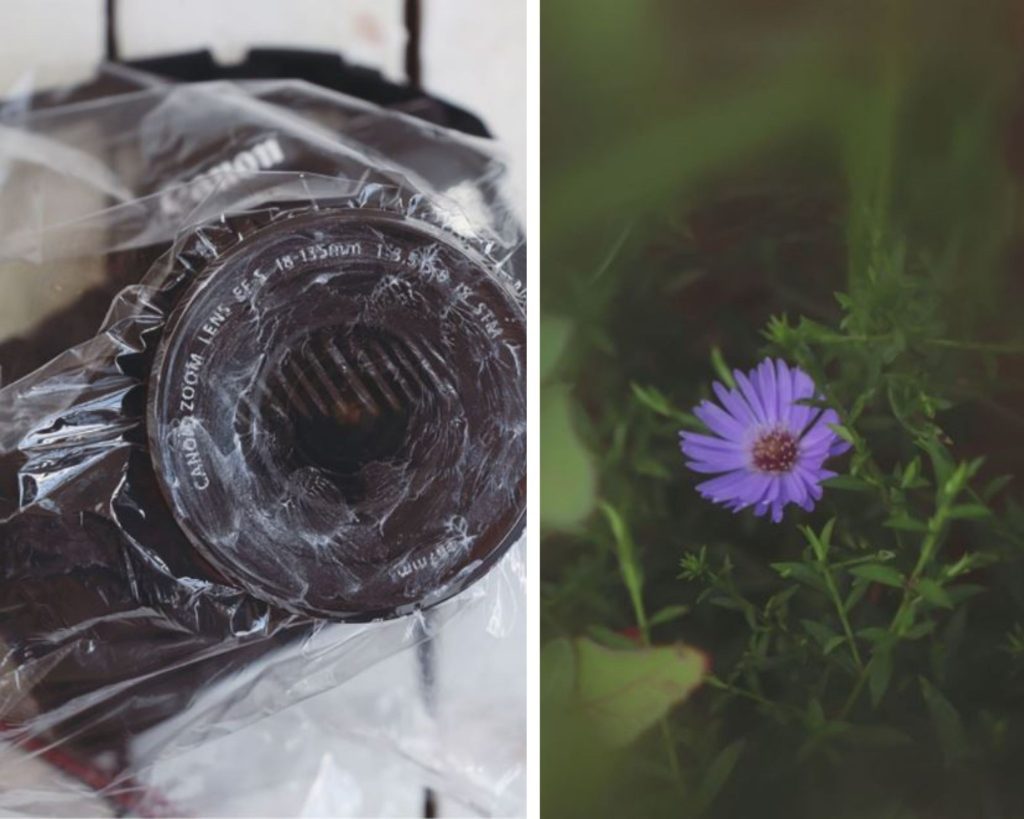
To achieve this effect without emptying your wallet for a soft-focus lens, all you need is some plastic wrap and a bit of vaseline. Put a plastic wrap on top of your lens, then smear some vaseline around the center. Make sure to leave a clear space, so you don’t have a completely blurry picture!
Lights, Lights, And More Lights
The photographer Brandon Woelfel became famous for his fairy light shots, and honestly, there’s no reason to wonder why. His photos are just so dreamy and pretty. Now, everyone’s trying out their version of it as well, and you can too.
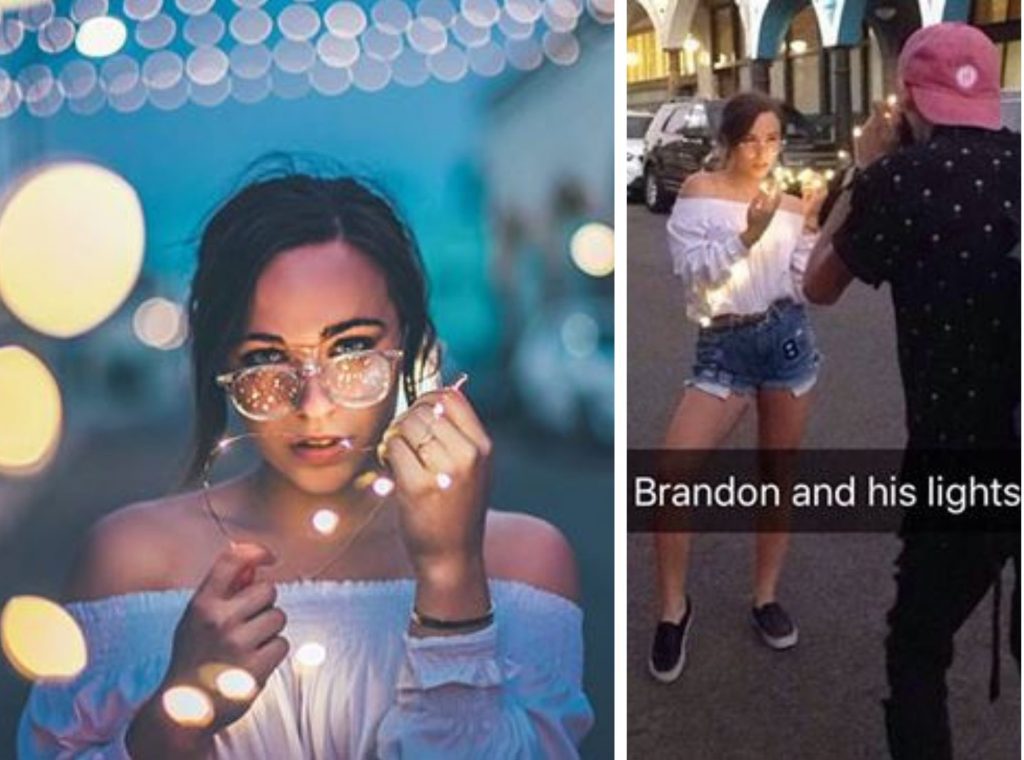
You need portable fairy lights. Once you’re on location, you can play around with distance, angles, and even reflections with the lights to create some seriously stunning effects. Make your model hold them, wrap them around them, or put them in their hair.
Use CDs For That Artsy Lens Flare
Lens flares have come a long way. Traditionally, photographers and even filmmakers did everything in their power to avoid them. Today, they are a favorite effect to add some drama and atmosphere to a shot. You know the ones we mean.
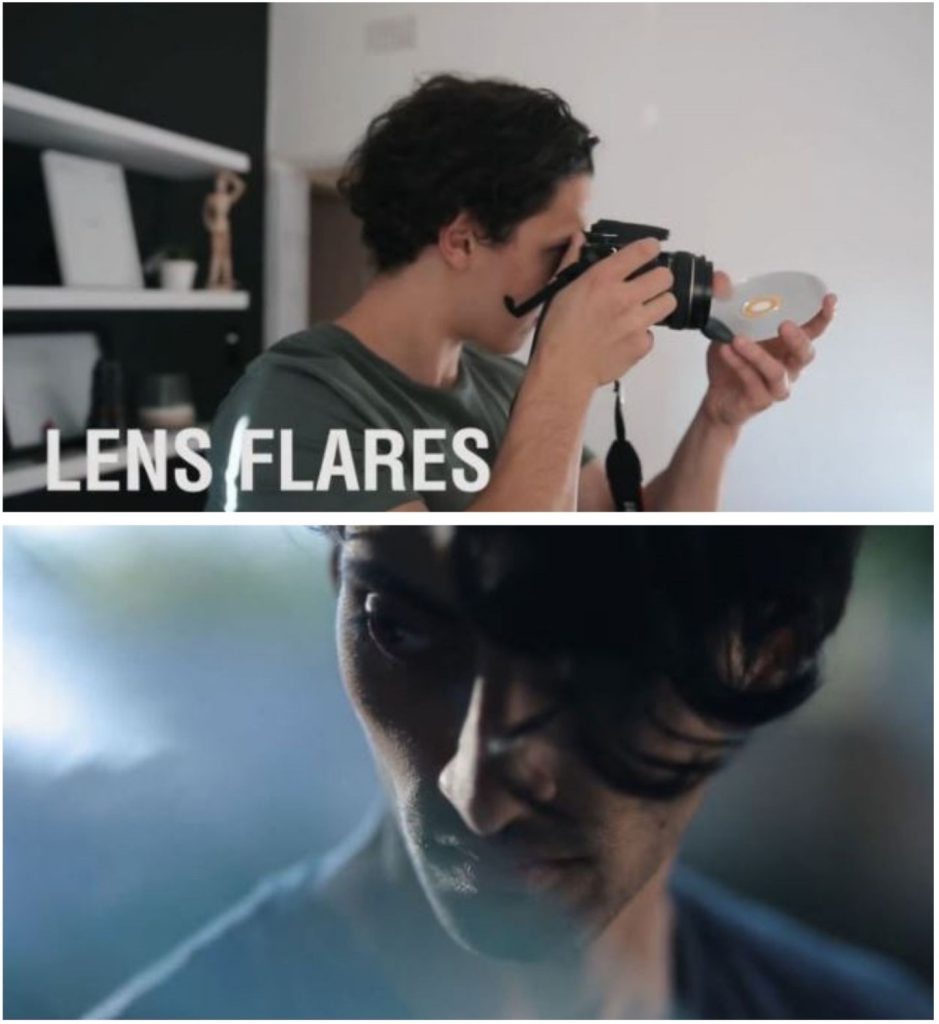
If you want to achieve this effect without any complicated post-editing or any fancy gear, all you need is a CD. Hold it near your lens and keep tilting it around until you get the lens flare effect you want.
Use A Coupon Bond As A Reflector
A reflector would be great to offset any harsh lights or shadows on your subject if you’re shooting outside. If you don’t always have one on hand, a white sheet of paper will do the job just as well.
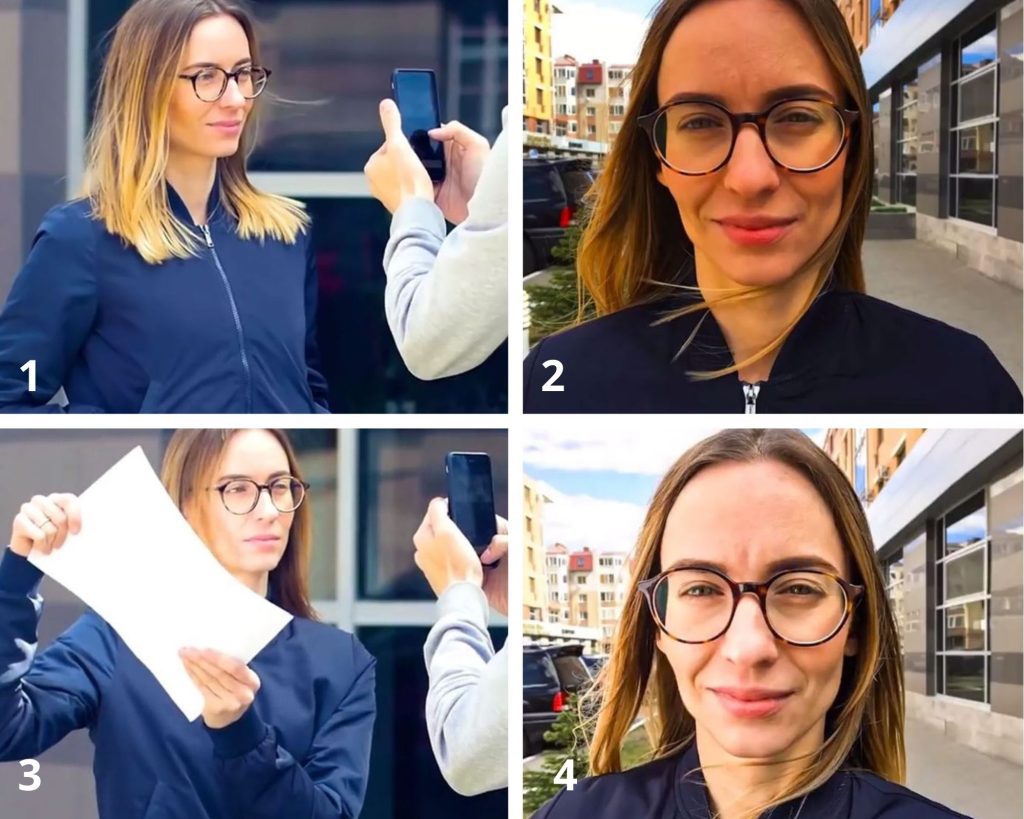
Check the direction of the light and place your reflector perpendicular to it. Adjust the distance between the sheet and your model to prevent too much light, and there you have some balanced lighting. You can use practically anything white, but paper is easy to deal with.
Use A Coffee Cup Holder For An Improvised Lens Hood
Lens hoods don’t only protect your lens from scratches or damage but they also block unwanted light and add more contrast to your images. When you’re shooting in strong lighting without this, your pictures can get washed out and look blah.
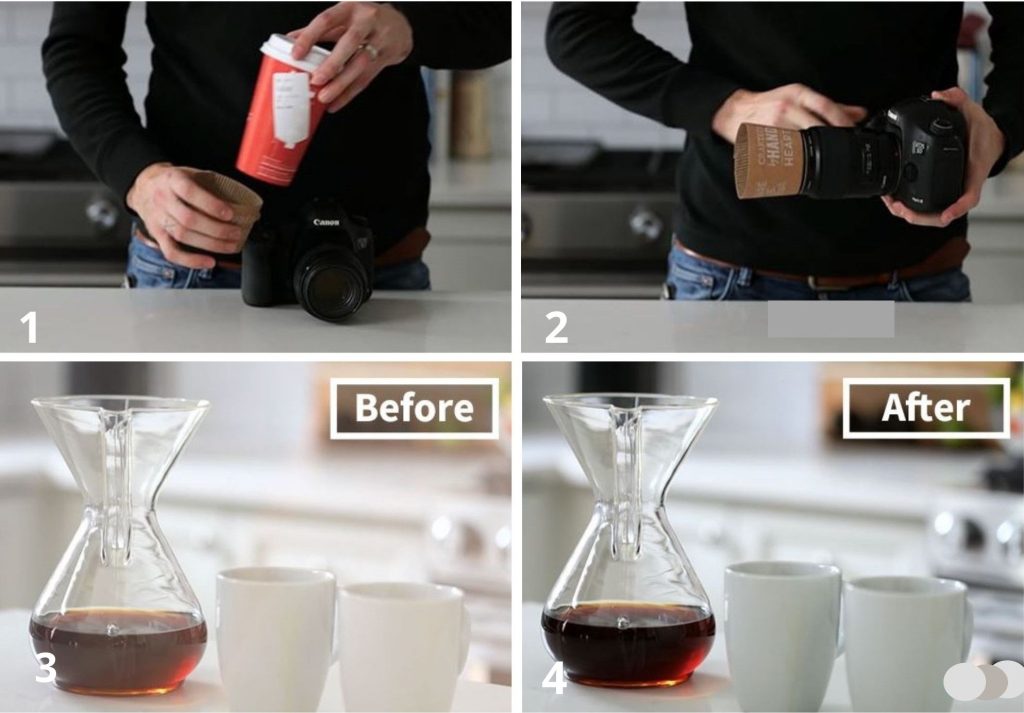
If you happen to be in a situation where you’ve lost your lens hood or have forgotten it, go to the nearest cafe or coffee shop and get yourself a cup. But don’t just sulk with your coffee, of course. Take the cup holder and use it as a temporary lens hood. It works!
Make Your Own Lens Filters
Lens filters are great stuff, we know that, and a lot of them are worth investing in, but why does it still hurt whenever we bust out our wallets to buy them? If you don’t want to empty out your pockets for filters, here’s a tip for you.
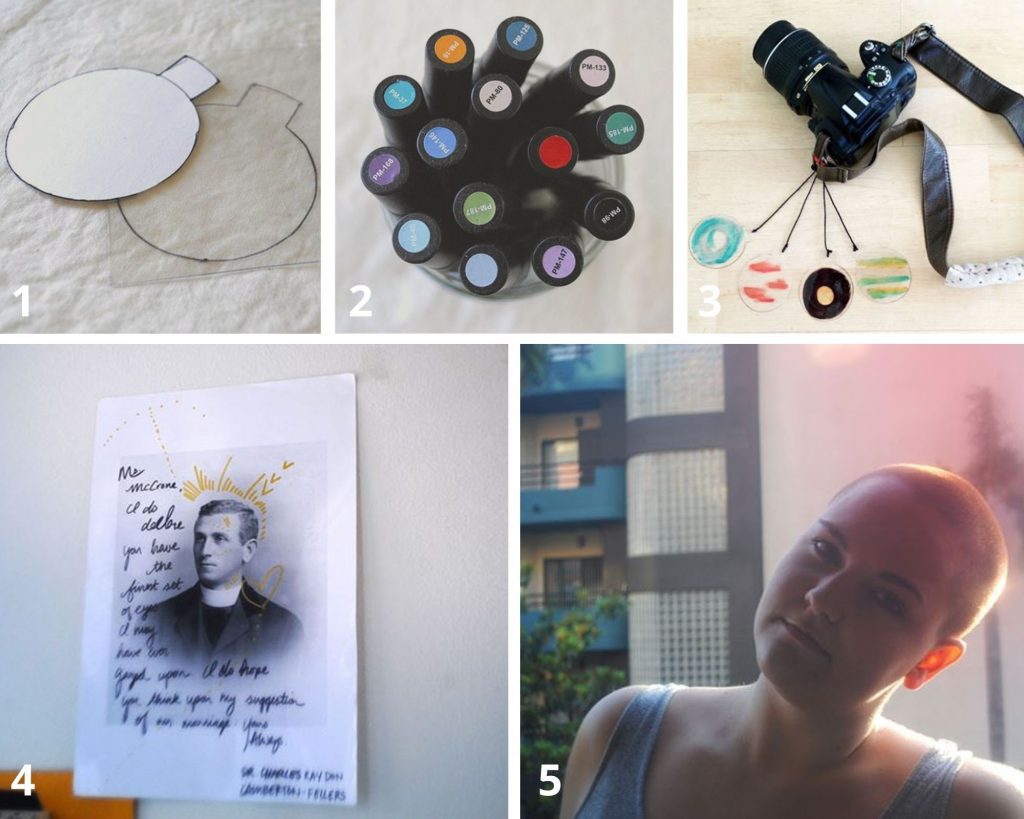
Grab some of those transparent films for projectors, then cut them into circles with little handles. Then, take some colored markers and color those bad boys in. They would work just as well as genuine filters, and you can be even more creative with them.
Upgrade Your Product Photography With A Black Tile
In the beginning, there are always lots of ideas to go around for shooting and showcasing your products. As you produce more photos, ideas can run out as time goes by. If that is the case for you, take a look at this tip.
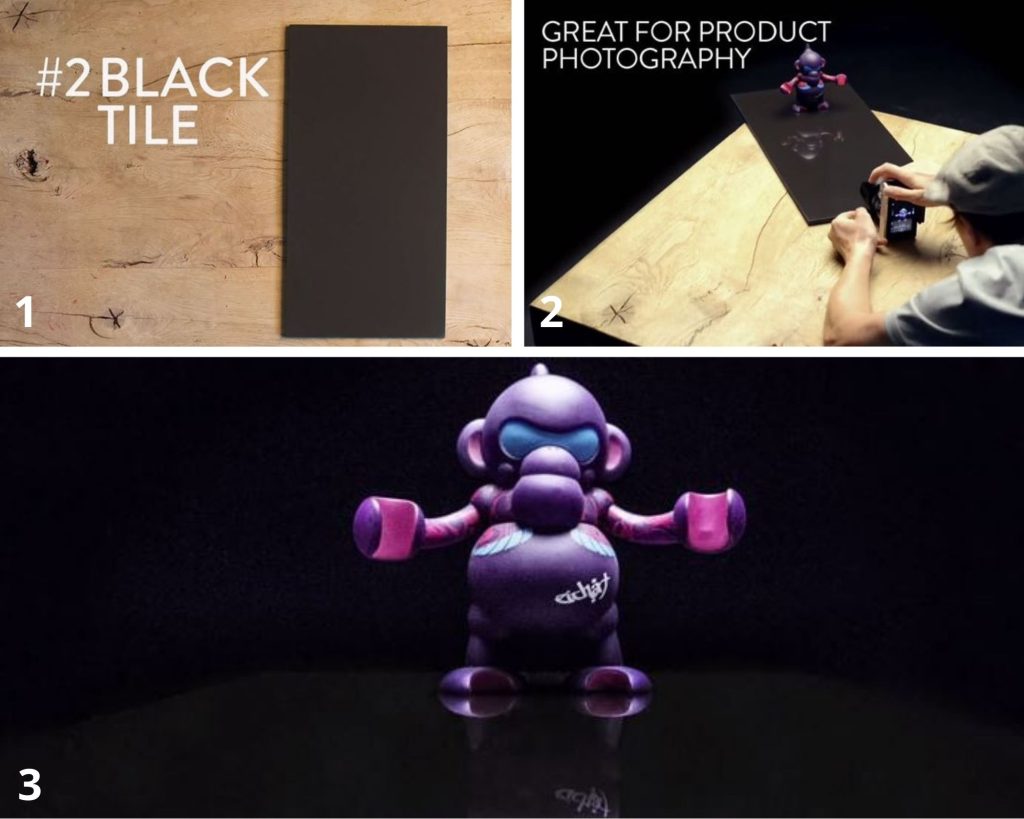
Using a black tile as a background for your products is an excellent way for a classy and elegant product shoot. It also looks modern, and it will definitely catch the eye of your audience no matter where you release that photo.
If You Want More Lens Flare, Use A Flashlight
These days, a lot of cameras and photography gear are made to specifically minimize lens flares or get rid of them altogether. However, we can’t deny that the effect that flares create on photos is just amazing. Sometimes, we want that misty glow.
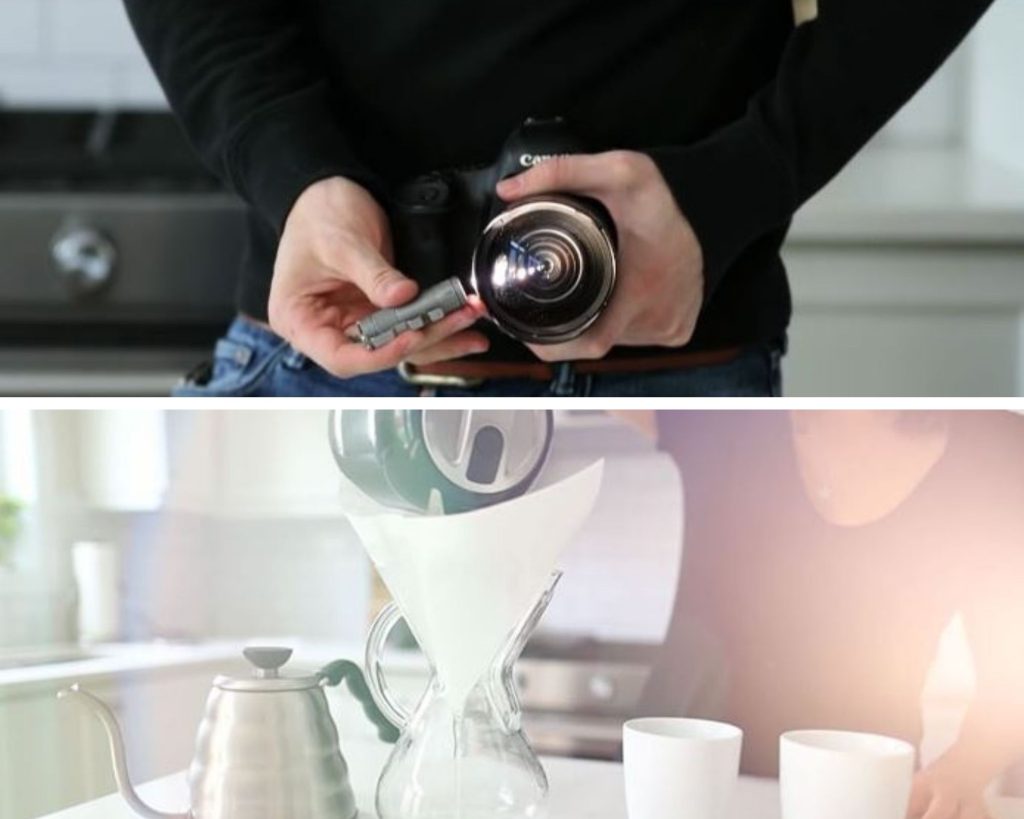
If your camera isn’t picking up enough light for a flare, then introduce more light directly to it. Take a small flashlight then shine it by the side of your lens to give it that extra light to create the desired effect on the photo.
Use Plastic Bags To Create Artsy Filters
We all know that plastic isn’t ideal for our planet, but we still can’t fully get rid of it. What we can do is reuse as much of it as we can instead of just throwing it away after one use. Reuse plastic bags and make them part of your photography gear!
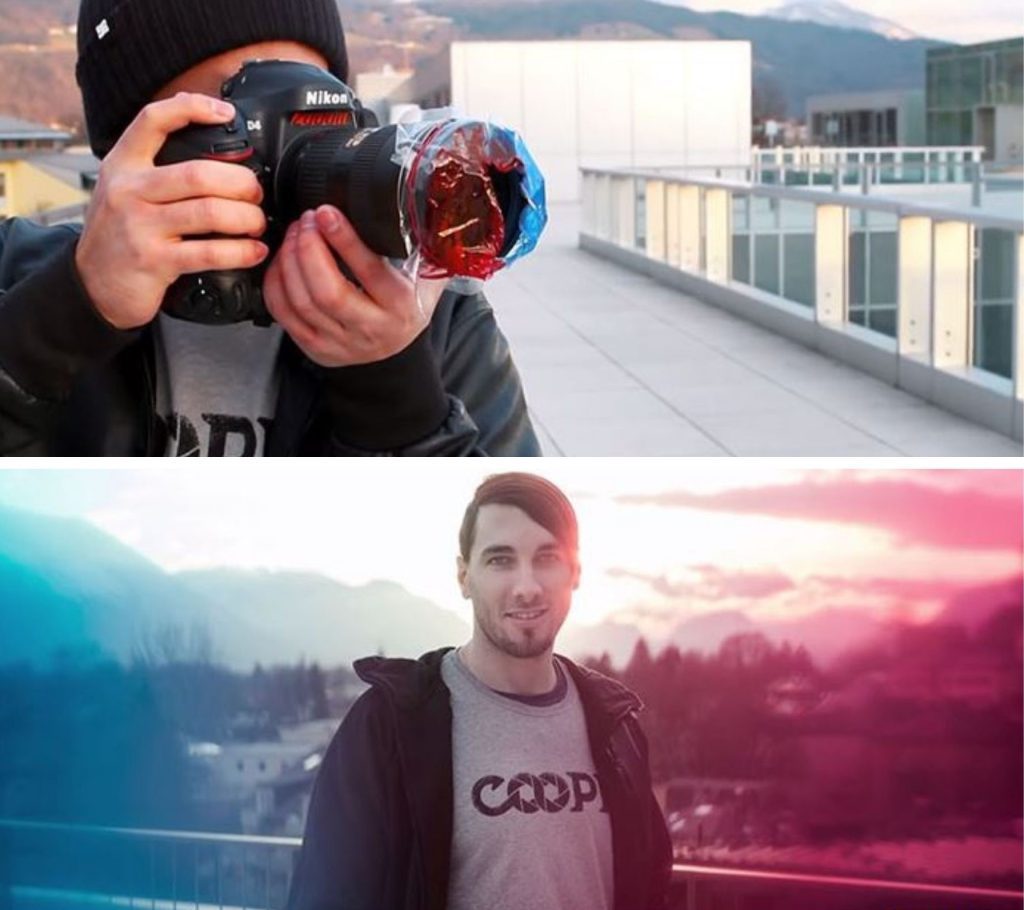
Use colored plastic to create your own artsy filters. Just cut a few strips, arrange them around the lens cap and see how they look. Keep changing their placement or adding more colors until you’re satisfied with your DIY filter.
Make Sure Your Food Looks Appetizing With A Steamer
In food photography, everything should look fresh, the colors should be bright, and the food looks like it came straight from the pan. Unfortunately, with all the prep photography takes, it’s difficult to catch that exact moment when the food is still steaming.
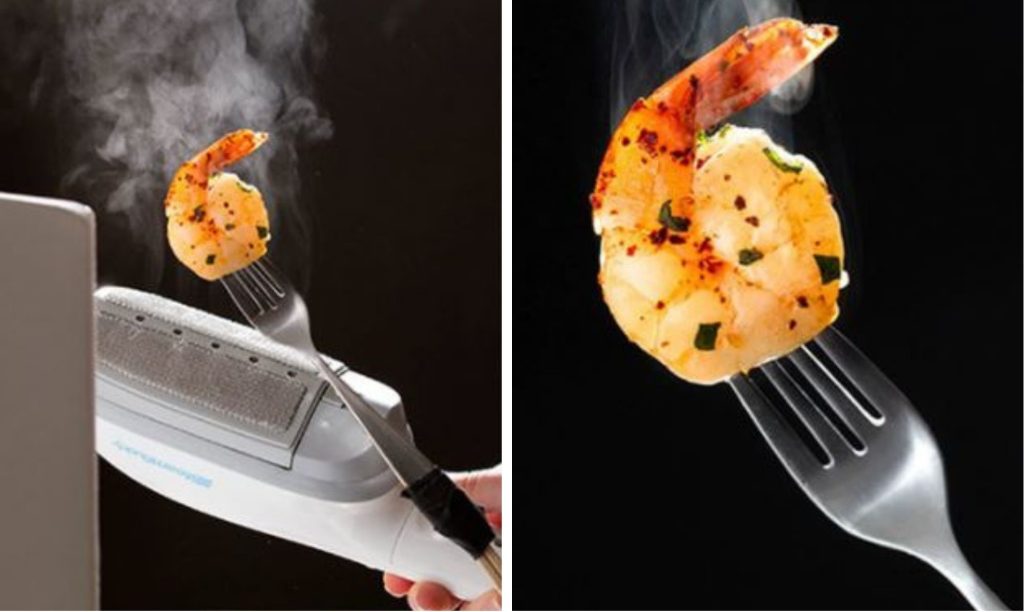
When it comes to filming or photographing foods, there are many tricks. One way you could make it seem that the food is as fresh as it can get is to use a steamer to create the illusion that it’s still hot and just came right from the pan. Simple but it fools people enough.
Cut Out Your Own Bokeh Shapes
Simple, plain, and classic bokeh is already good enough on its won but if you want to bump it up a notch with a little bit of customization for events perhaps, then here’s a tip for you. Create your own!
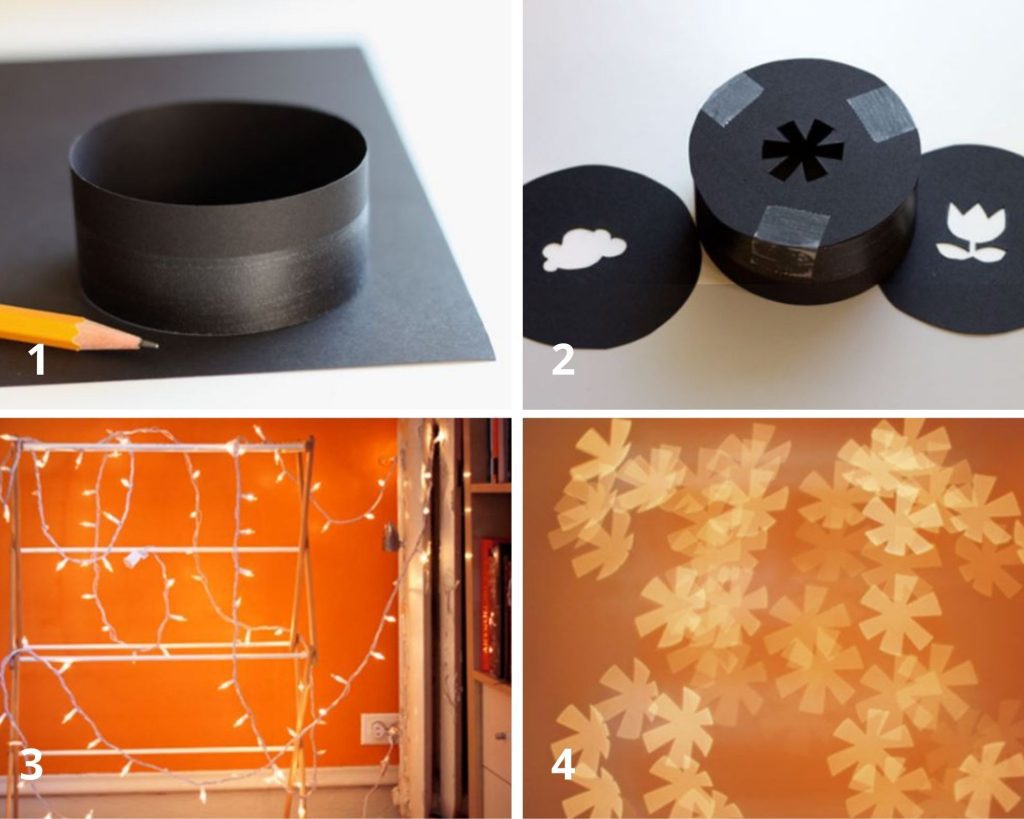
Take some black sheets of paper and cut them to the shape of your lens. It would be better if you find a way to make sure no light gets in other places. Then, cut out the shape you want in the middle of that sheet of paper and stick it on your lens.
Use A Glass To Create A Dramatic Cinematic Effect In Your Photos
A lot of the time, people depend on post-editing for color grading and setting adjustments to get their photo to reflect the mood they want. However, you can also achieve a lot of those effects in real-time with everyday objects.
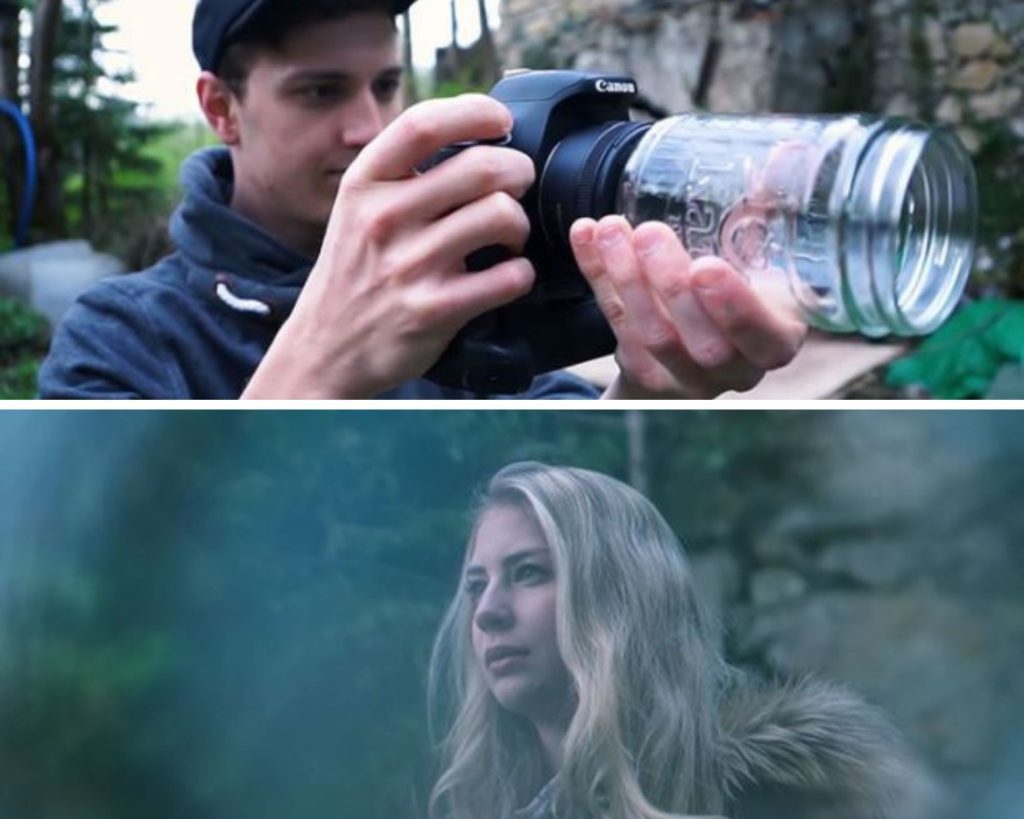
In this instance, this mason jar is giving the photo a Twilight kind of effect. You can also try other glasses of different colors and even other textures to create various effects and moods for your photos. Easiest hack of them all!
Use Cloth To Create Interesting Framing Or A Soft Effect On Your Photos
Framing and the soft effect look are some of the easiest things to improvise in photography because you simply need a little bit of distortion on your lens to create it. One way is to use a piece of cloth.
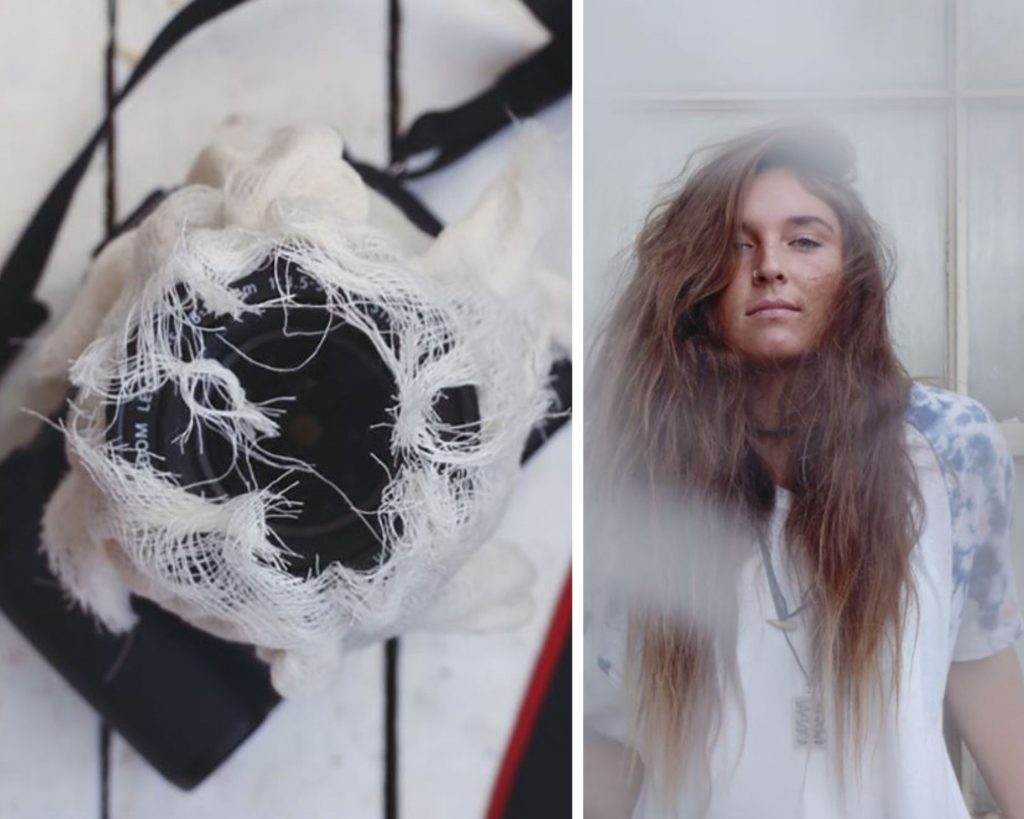
If you have something that has a few strands, or even a sheer kind of cloth, you can wrap it around the lens. Make sure to leave clear spaces in the middle and there you have a handy framing element that doubles to create a soft effect for your image.
Create A Big Softbox For Home Photoshoots
Sometimes, a small improvised softbox on your camera’s flash just won’t do, especially if you’re going for a full-body photoshoot at home or in an improvised studio. Fortunately, you can create your own softbox with things you can find at home like a shower curtain, closet rod, and a strong source of light.
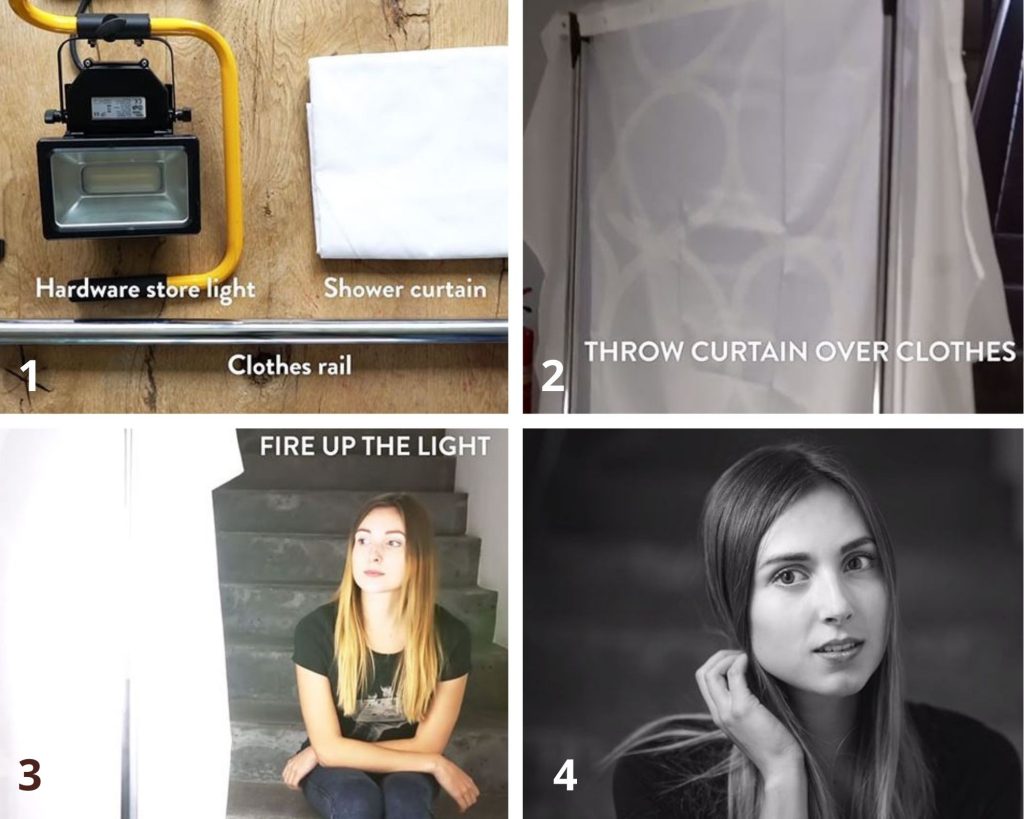
Simply drape the shower curtain over the rod and put your source of light behind it. This will diffuse the light just enough and give you a well-balanced image. You can even be more creative and add colored lights to give it a bit more spice.
Reduce Camera Shake With A Baggie Of Beans
A shaky camera can be one of the most frustrating things on Earth. There you have the perfect shot lined up and the conditions just right and then one little twitch from a tired hand carrying a heavy camera can ruin it all.
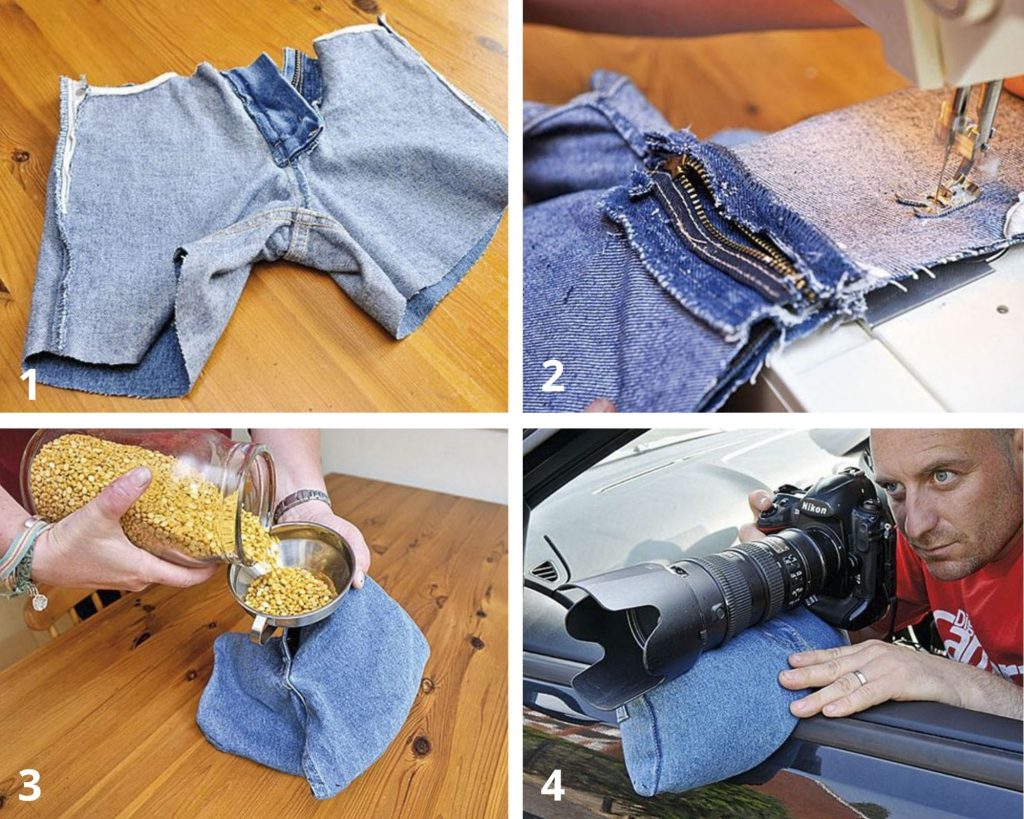
A tripod could help, of course, but there isn’t always time to set one up. To help with this, carry around your own homemade camera rest. You don’t have to stitch up some pants like shown above. You can simply look for a small pouch or bag and fill it up with lentils or beans.
Create Your Own Rain Guard With An Empty CD Case
Rain or shine, we have to get those shots but, of course, we wouldn’t want our precious, and not to mention expensive, equipment getting wet. As all photographers will tell you, it would be better if the person gets wet rather than the camera.
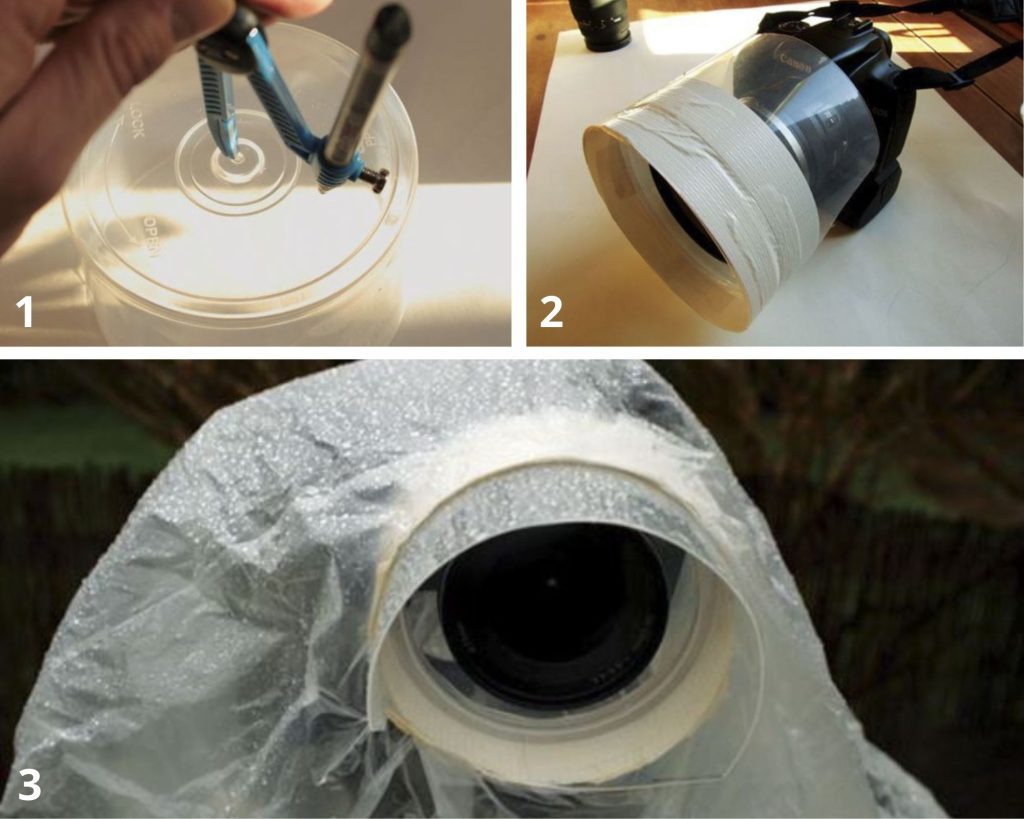
To help with this, you can create your own rain guard with one of those plastic CD cases. Cut out a hole at the bottom and stick it to the body of your camera to protect your lens. Then, drape a layer of plastic over the body to fully protect it from the water.
Make Your Own Pinhole Filter With Cardboard
There’s something charming about pinhole photography. It pulls the entire focus to your subject, and in this day and age, it’s not a common way to frame stuff. A cool thing is you can create this effect with your phone.
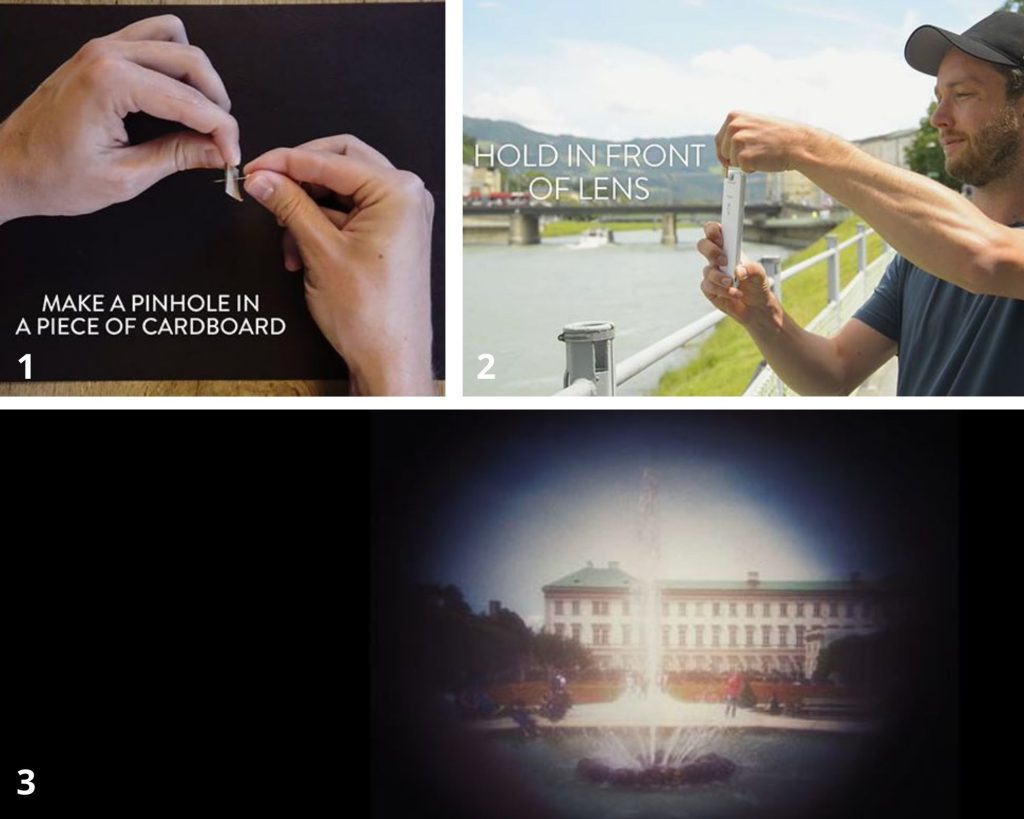
All you need is a small piece of cardboard and a needle. Poke a hole through the cardboard and then hold it in front of your phone camera. This will give you a pinhole view of your subject and create unique photos for the ‘gram.
Create A Sparkly Ring Of Fire For The Holidays
When it comes to festive photos, you can’t really go without sparkles, fireworks, and all that. They’re like an essential to holiday pictures in addition to the clothes, food, and drinks. Of course, you can’t put actual fireworks and other dangerous stuff near your models, right?
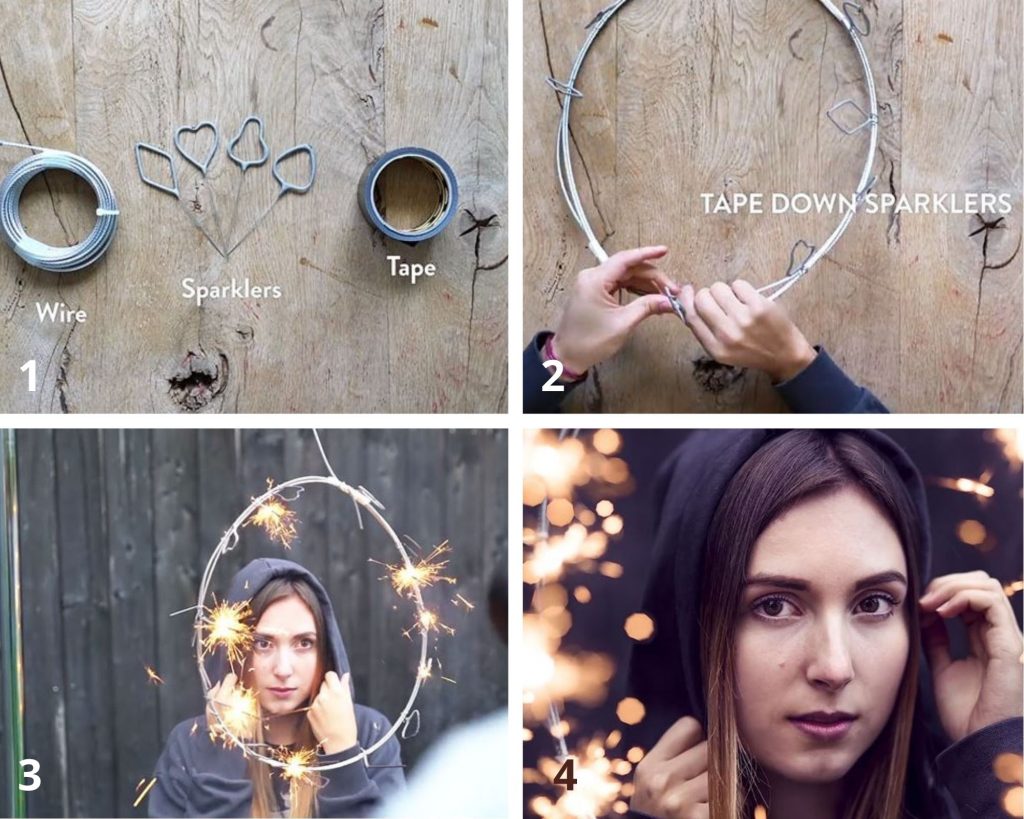
For a safer option, grab some sparklers instead. Tape them down to wire and use it to frame your models. If you want a different arrangement, you can play around with your wire shape to create a more interesting framing.
Capture High Speed Drops With A Few Items
Liquid droplets getting caught on cam while they’re flying in the air or jumping from a beverage is a sight to see. Not only that but they make drinks a lot more delectable looking. Somehow, these shots make any drink more appealing.
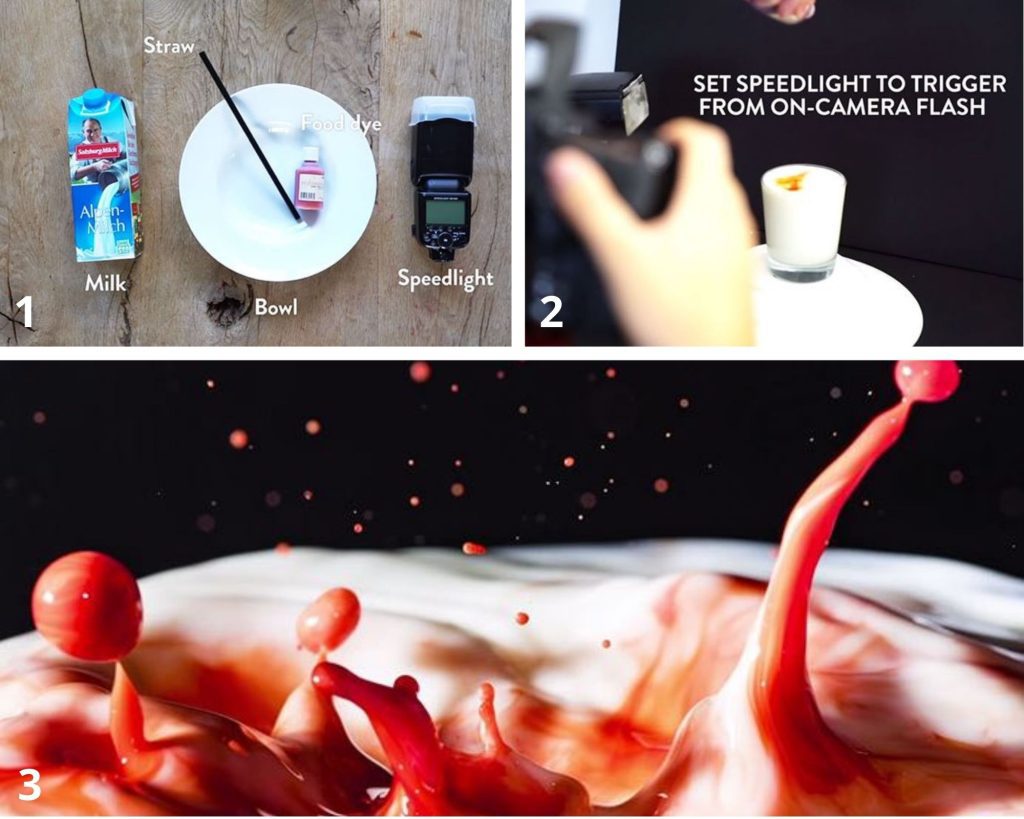
To capture these on your own at home, you’re going to need a container, the beverage of your choice, and a Speedlight. Simply set the Speedlight to trigger from on-camera flash and it’ll help you capture images of some crisp droplet action.
Use Plastic Props For At-Home Wildlife Photography
The wild is a wonderful place for photography. There is just so much beauty to capture there. However, not everyone can go to the wild and not everyone can survive out there. That shouldn’t stop you from taking wildlife photos if you want to!.
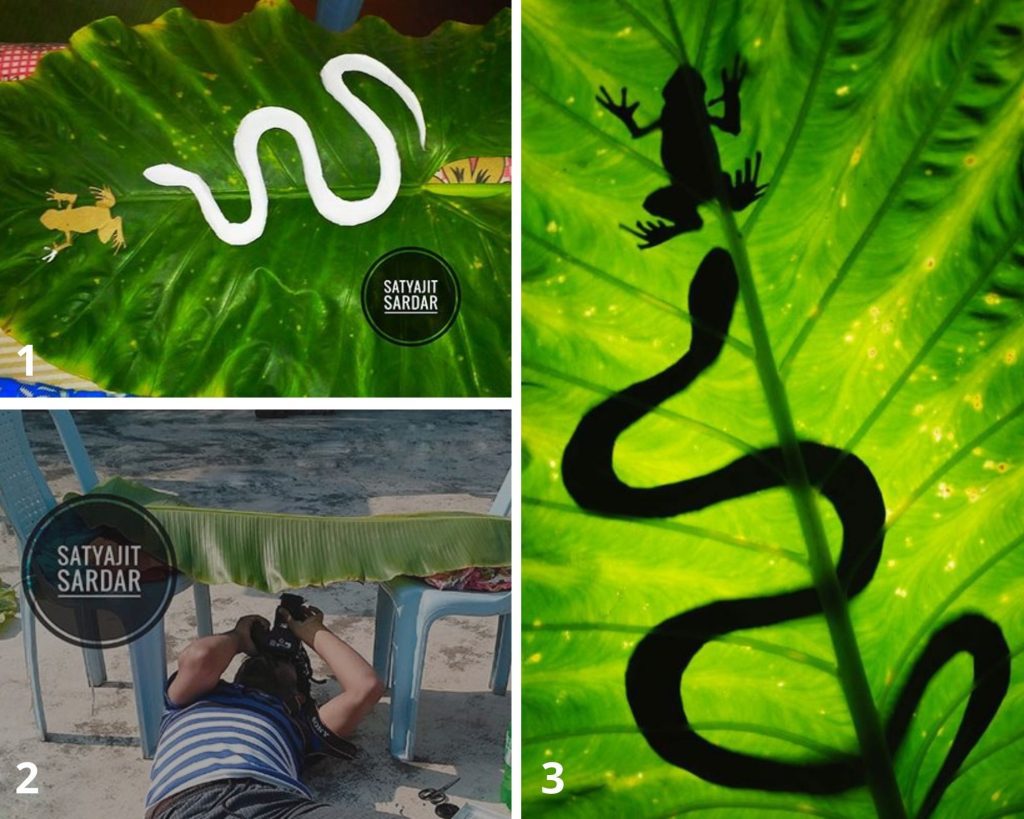
You might just have to fake it a little. Instead of going to a jungle, get yourself to the dollar store or any shop that sells plastic animal or plant props. Once you have them, unleash your creativity and find a way to position them without really revealing they’re just props like the image above.
Use A Prism To Reflect Background
More and more people have been using prisms in their photography and we absolutely get why. It is such an amazing tool that can create plenty of filter effects for your photos like the one below. Who doesn’t love this effect?
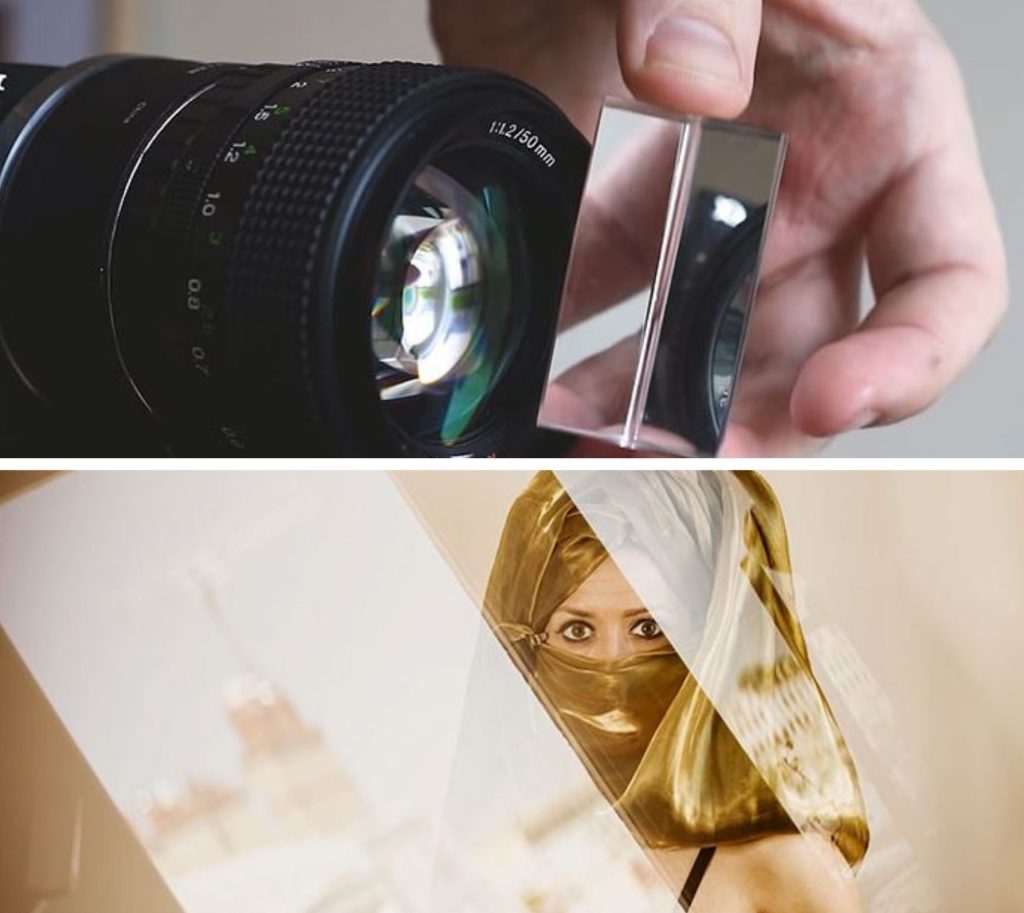
In addition to building reflections, though, prisms can also help you achieve a lens flare effect, add some rainbows to your pics, and even transparent glass effects. It’s also so easy to carry around and bring with you wherever you go.
Mimic The Film Burn Effect With A Matchstick
This effect can mostly be seen in photos taken by old film cameras. And while tons of filters online nowadays can help you imitate the effect, nothing beats creating the effect manually while shooting through your cam. The authenticity will make you feel like the artist you are.
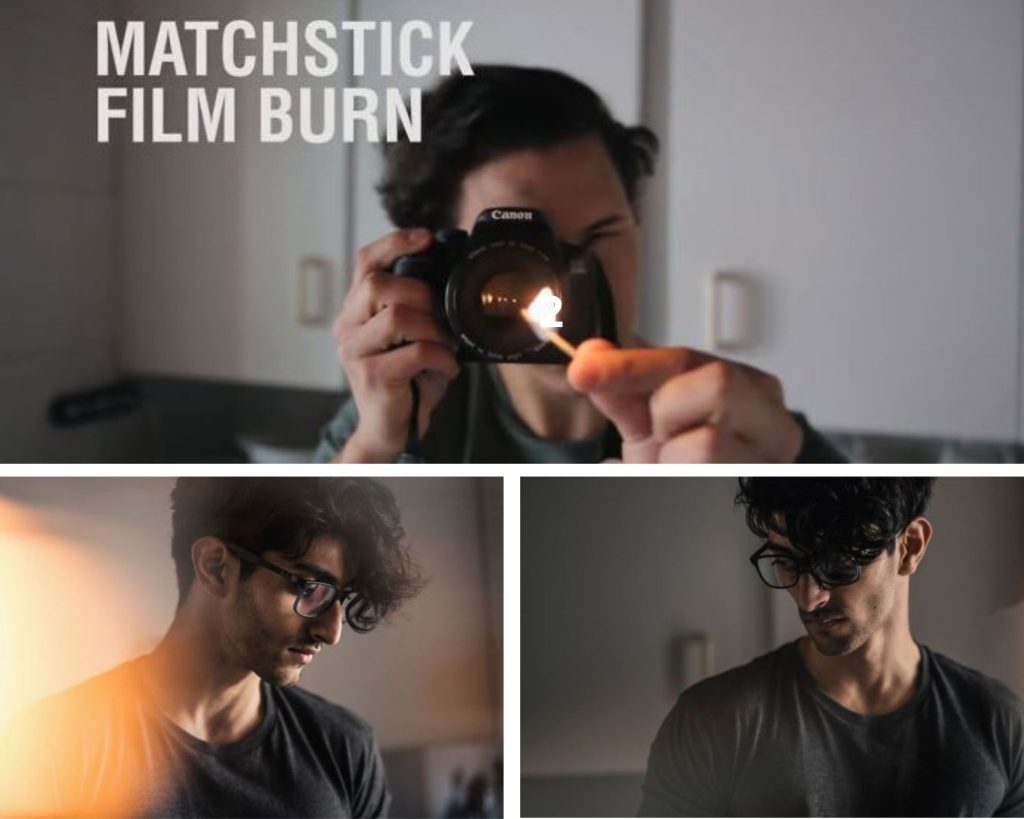
To achieve this without having to scrounge up an antique camera and film, prepare to play with some fire. Light up a matchstick and hold it up a few inches away from the lens to get yourself that authentic film burn effect. Be careful, though!
Create Vignette With Vaseline
The vignette filter is such a great way to add drama to a picture. While you can easily add it in posts or use some filters available online through your phone, it’s still a lot better to see it in action while you’re shooting the photo so you can be sure of the results.
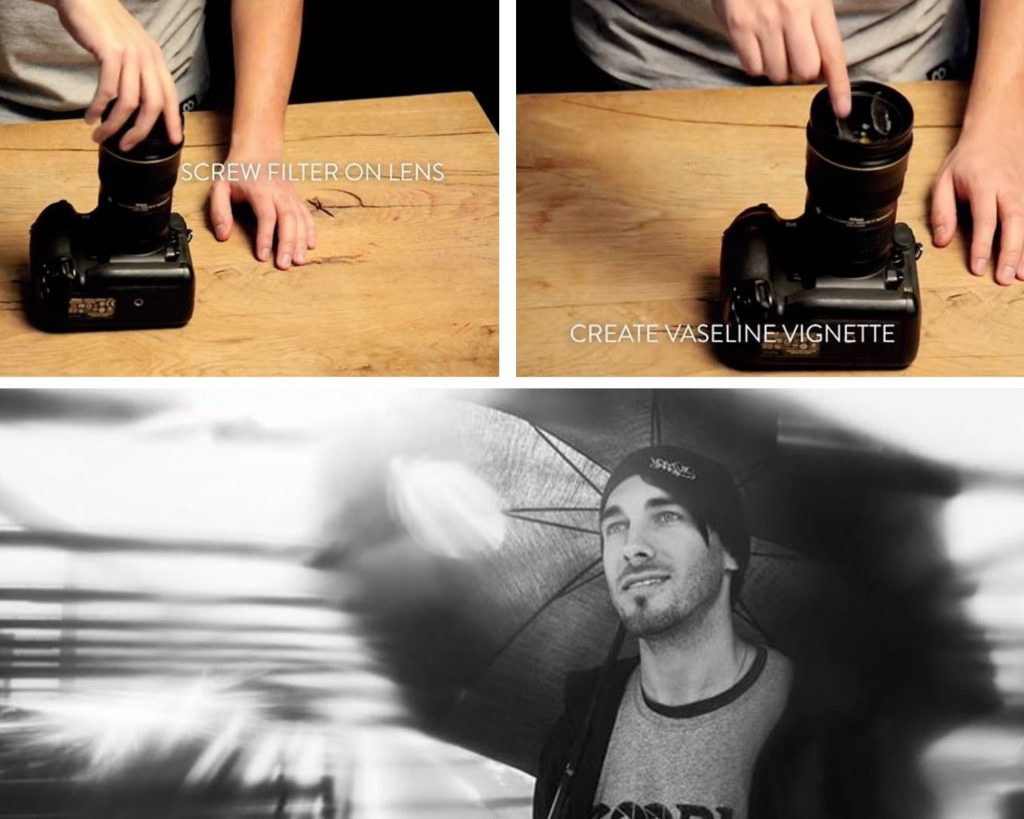
If you want this effect, take your filter and smear some vaseline around the edges. It’s not advisable you do this directly on the lens, although it does wipe off easily. This will get you a mix of a slight softening effect and that beautiful vignette.
